Converter for Media Plugin Review – Full Guide
More than ninety percent of consumers make use of web browsers that are compatible with the WebP file format. The total size of your website and how well it optimizes its images both have a significant impact on how long it takes for the page to completely load. With the help of our WebP Converter, you can now do that and speed it up in just a few seconds without putting in a lot of effort!
This will be beneficial not only for your users, who will not be required to download as much data but also for a server that will experience a reduction in the amount of load it is experiencing. Keep in mind that your Google ranking might be affected positively or negatively by how well your website is optimized. The optimization of images is of critical significance. Before going to learn more about Converter for Media plugin, let’s see what is the web image.
What is a WebP Image?
WebP is a type of image file that Google made. This new format was meant to replace PNG, JPG, GIF, and other popular formats. WebP can compress, animate, and be transparent very well. In September 2010, Google came out with WebP. It set a new standard on the web for true colour graphics that use lossy compression. WebP made images that were much smaller than JPG images of the same quality. When Google added support for transparent and lossless images to WebP in 2012, it became an alternative to PNG. WebP’s lossy compression uses something called “predictive coding” to encode images. In the VP8 video codec, predictive coding is often used to compress keyframes in videos.
In predictive coding, the values of the pixels in the blocks around a block are used to figure out what the value of the block will be. Then, only the difference is used to encode. WebP, on the other hand, doesn’t lose any information when it compresses images. Instead, it uses parts of pixels that have already been seen to make new ones. If it doesn’t find a match, it can use the local palette. Look at the pictures in the WebP gallery of Google: Notice that there are no obvious differences between JPG and WebP files, but WebP files are up to 30% smaller in size than JPG files. In case you didn’t know, images make up 21% of the weight of a page. That’s why you need to learn how to optimise images. WebP is the best choice.
What is a WebP file, then? In a nutshell, WebP is an image format that Google made so that images can be optimised better than in other formats (at that time). For example, you can save pictures as JPEG, JPG, or PNG.
JPG, PNG, and WebP Size Comparison
WebP images are always smaller in size. The distinctions between WebP and JPG have already been discussed. The following WebP version was created using an Adobe Photoshop plugin: See how there is no discernible difference between the two images, which are virtually identical? This image will significantly reduce the amount of time it takes for a page to load (54.54% smaller). Comparing PNG and WebP So, here is what happens when we use the same image: That represents a significant image size reduction of 64.32%.
Note that when I switched from WebP to JPEG, I utilised 60% lossy compression. I retained the image’s transparency by saving it in the PNG-24 format. There should be no question that WebP is a significantly superior format to JPG or PNG. It can be difficult to imagine how much something can be shrunk. When you start using WebP, your website should load much more quickly. You can provide users with a better page experience if the loading time of your website is significantly reduced.
JPG vs. WebP vs. SVG – Which One to Use?
The complexity of the drawing determines how large an SVG file will be. When the drawing is simpler, the file size decreases. As a result, there is no useful comparison. The file size of SVG is frequently substantially smaller than that of JPG or even WebP, making it the obvious victor in several situations. The SVG picture might occasionally be the largest of all. Depending on what is depicted. SVG files make up the majority of the photos on my website. The illustrations I use are quite light because they are not drawn in a complex manner. Here are three examples of the same image in various formats: SVG is one-eighth the size of JPG and is one-third the size of WebP. Therefore, using SVG in this scenario makes sense. But if I use an SVG file with a complex scene, everything will be different.
The file size will increase to the point where it cannot be used online. When I use SVG images, Google PageSpeed Insights doesn’t advise me to utilise NextGen images, which makes reasonable. This is due to the fact that the SVG pictures I use typically don’t exceed 12 KB in size. That is completely fine with Google! SVG is primarily used for visuals like logos and icons. I utilise a lot of SVG pictures on my site, as seen by the following example: Each SVG element is highlighted with a purple box. Depending on the requirements of your website, you should typically utilise WebP, SVG, or both. If you run a food blog, for instance, you can use an SVG logo but you should utilise WebP images for the photos that appear inside the posts.
Do All Browsers Support WebP Images?
WebP has been around for nearly 11 years. So, it is a protected guess that every browser in this world will be capable to display WebP photographs. You are fully improper! Not all new browsers can use WebP. This format shouldn’t be supported by Internet Explorer and KaiOS Browser.
The browsers that assist WebP Plugin includes:
- Google Chrome
- Opera
- Opera Mini
- Chrome for Android
- Android browser
- Microsoft Edge
- Mozilla Firefox
- Brave
- Safari on iOS
WebP vs JPG vs PNG Size Comparison
According to Google’s assessments, WebP images are:
- 25-34% smaller than comparable JPEG images.
- 26% smaller than associated PNG images.
If you want to examine additional about Google’s methodology, you may discover direct hyperlinks to the whole outcomes below:
Both assessments are based on over 11,000 images, along with:
- The well-known Lenna image
- 24 images from Kodak true color image suite
- 100 images from Tecnick.com
- A random sample of 11,000+ images from Google Image Search
How to Use WebP Images on WordPress
WordPress 5.8 supports WebP images in the JPEG, PNG, and GIF formats. Add your pictures straight away to your Media Library. WordPress 5.8+ does not require third-party plugins in order to upload WebP images. That ought should handle most uses. With our straightforward technique, WordPress 5.8+ users can start using WebP pictures. Read the disclaimer about WordPress WebP. Only 5% of users, mostly those using Safari on earlier macOS, do not support WebP. The browsing experience of your consumers could be harmed if you convert WebP images and utilise them in your content.
Compared to JPG/JPEG photographs, which are the preferred format for the majority of cameras, cellphones, and online image libraries, WebP photos are more challenging to create. WordPress does not support WebP image encoding (yet). Relax! Solved. Using a WordPress plugin, you may convert your original photos to WebP and offer the original image as a backup.
When you send the plugin a JPEG, it will:
- Make the JPEG file accessible in Chrome, Firefox, Edge, and other browsers by converting it to WebP.
- The original JPEG file will be displayed to users of Safari (on earlier macOS versions) and other browsers that do not support WebP.
In this manner, everyone can see your image and enjoy themselves to the fullest extent.
Converter for Media – Optimize images | Convert WebP & AVIF – Best Plugin for Image Compression.
Our straightforward image optimizer can make WebP and AVIF photographs on your site load more quickly. By moving from the more popular JPEG, PNG, and GIF formats to WebP and AVIF, over half the page weight can be decreased without sacrificing quality.
Once the plugin has been installed, nothing else needs to be done. Your existing photos will be converted into a different format. The user will instantly receive a fresh, optimized version of the image that is much less in file size when our image optimizer has finished processing an image.
More than 90% of Internet users as of this writing use browsers that can display WebP files. If you minimize the size of your website and increase its image optimization, you should see a big reduction in load time. With the help of our WebP Converter, you can now do so quickly and easily.
Less downloading will be appreciated by your users, and your server will welcome having less traffic as a result. Remember that your website’s optimization has an impact on how well it performs in search results. Image quality improvements are essential.
AVIF SUPPORT
You can now utilize AVIF as the output format for your photographs in the PRO edition. The WebP format was replaced by the new extension known as AVIF. Even higher degrees of image compression is possible with AVIF, and the transformed images’ quality after image optimization is superior to WebP.
HOW DOES THIS WORK?
- If you recently installed the plugin, you may easily optimise photos.
- The size of the image will decrease after webp generation!
- The Media Library’s newly added photos will be immediately transformed.
- Your original photographs are not altered in any way by our image optimizer. This ensures the safety of your files and you.
- Our plugin determines whether the browser supports the WebP format before the browser loads an image. If yes, a WebP-formatted image is loaded.
- In default mode, the plugin does not do redirects, therefore the URL remains constant. Only the image’s MIME type switches to image/webp.
- Without redirects, your website will run more quickly and without error. Check out the FAQ for the plugin below if you want more information on how it functions.
- It is irrelevant whether you use background-image or have the image display as an img HTML tag. It always works!
- If rewriting by.htaccess file rules is prohibited, an option that loads pictures via PHP file is available. Then, although the logic of operation is different from that of the normal mode, the picture URLs are modified.
- After image optimization, your viewers will download less data overall and the page will load more quickly.
- You don’t lose anything because if you had to remove the plugin, it would do so automatically. You can easily check it because it leaves no trace.
CONVERT WEBP – IT IS THE FUTURE OF IMAGE OPTIMIZATION!
Improve your image optimization and upgrade your website right away! Enjoy a website that loads more quickly thanks to image optimization by installing the plugin. You and your users will undoubtedly find it useful.
SUPPORT FOR ADDITIONAL DIRECTORIES
Not only from the /uploads directory but also from the /plugins and /themes folders, you can convert WebP and optimize photos. The WebP format may be fully integrated thanks to this!
SUPPORT TO THE DEVELOPMENT OF THE PLUGIN
This plugin was the result of numerous hours of work. Technical support requires a lot of work, but we put in the effort because we want to deliver you the best plugin. For us, installing a new plugin is enjoyable.
You can try the PRO version if you want to enjoy it. You will also have access to other features that will help you get even better results from image optimization.
1. Installing the Converter for Media Plugin
Log in to your WordPress admin panel. In the left column navigation, mouse over the “Plugins” link and click the “Add New” link.
In the “Search plugins…” box, enter, “WebP Converter.” When you find the plugin, click the “Install Now” button. Now the plugin is installed, but it has to be activated before you can use it. Click the “Activate” button. At the time of writing this review on Convertor for Media, it has Two Hundred Thousand. active installations, and 653 feedback, which is very good compared to other converter plugins of the same category. so we highly recommend it for installation to save space and increase the speed of your website.

That completes installation and activation. Now let’s move on to getting the plugin up and running on your website.
2. Configuring the Converter for Media Plugin
Once you’ve turned on the plugin, you’ll see a “Speed up my website” button on the plugins page. When you click it, you’ll go to a page where you can change things. Don’t worry if you can’t find the button or are no longer near it. Move your mouse over the “Settings” link in the left column and click on the “WebP Converter” link.
A Note on a Potential Issue for Some Websites
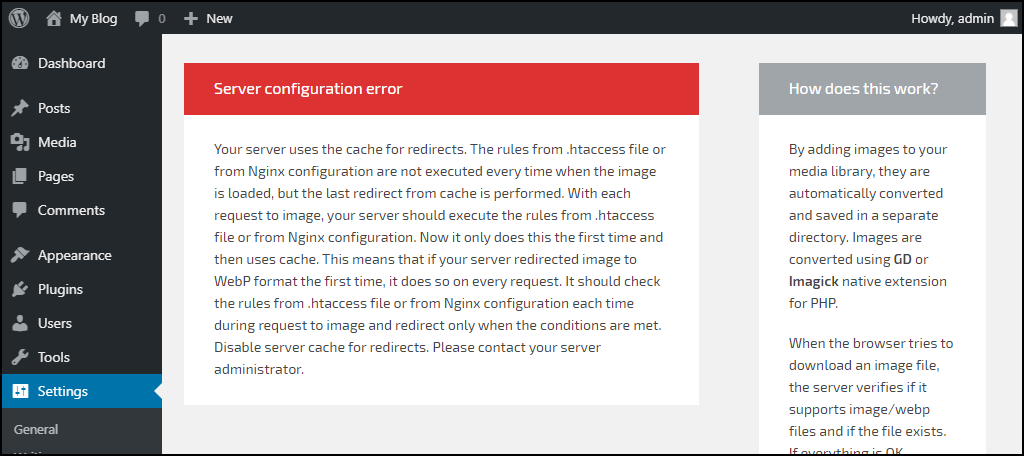
If server caching is used for redirects on your web host, the plugin won’t work right. The plugin can tell if you’re using caching and will show you this error if you are:
If you see this error, you should ask your web host to stop your account from caching redirects on the server. You can’t use the plugin if that isn’t possible or if your host doesn’t want to make the change. Don’t just skip over the error and keep setting up the plugin. If the plugin is run on that server, it will make it hard to see images. Okay, let’s get back to our plan. The first thing you’ll see on the WebP Converter page is a list of file extensions that can be used. Those are the types of files that the plugin can open. The plugin, taking care of the users’ safety, detects a dozen or so potential problems with the server configuration. It informs you about them and gives you instructions on what to do. This mistake you had is one of the potential ones.
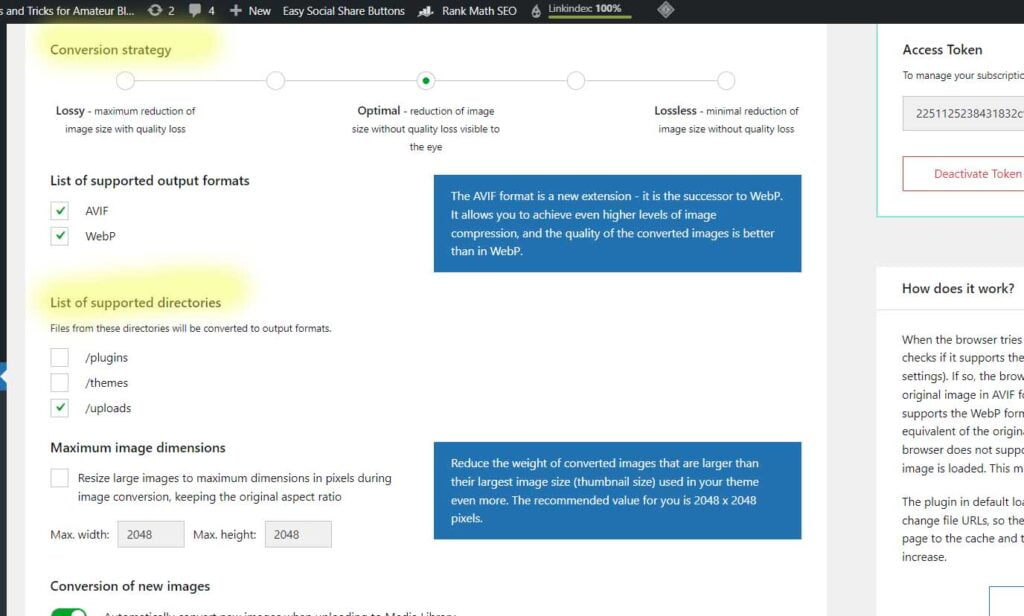
You can select which conversion strategy you want to select, lossy conversion for max. reduction in image size, or optimal reduction in image size which is default conversion, or if you like you can select lossless which is a reduction in image size without quality loss in the image. Next is the List of supported directories section. By default, only your uploads (usually in the Media Library) are selected. If you want to convert your theme images to WebP, check the “/themes” box.
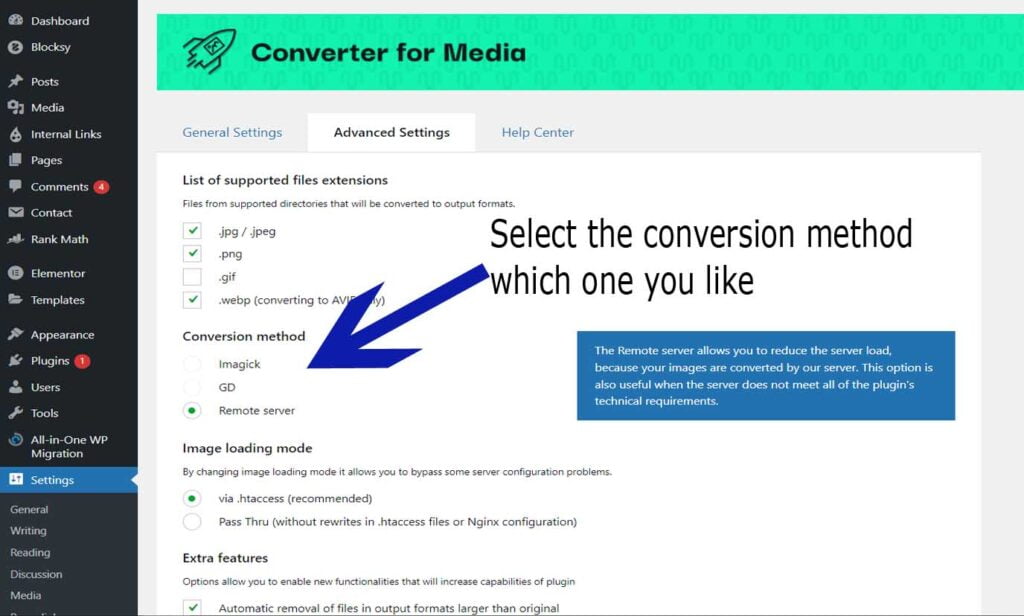
 The Conversion method option can be left on the default “GD” setting. If you use or prefer Imagick, you can select that option (if your server supports it).
The Convertor for Media in Media Library section shows the amount of compression the plugin uses to convert JPG to WebP. The larger the percentage here, the larger the image files will be for each image.It shows how much image size reduces.
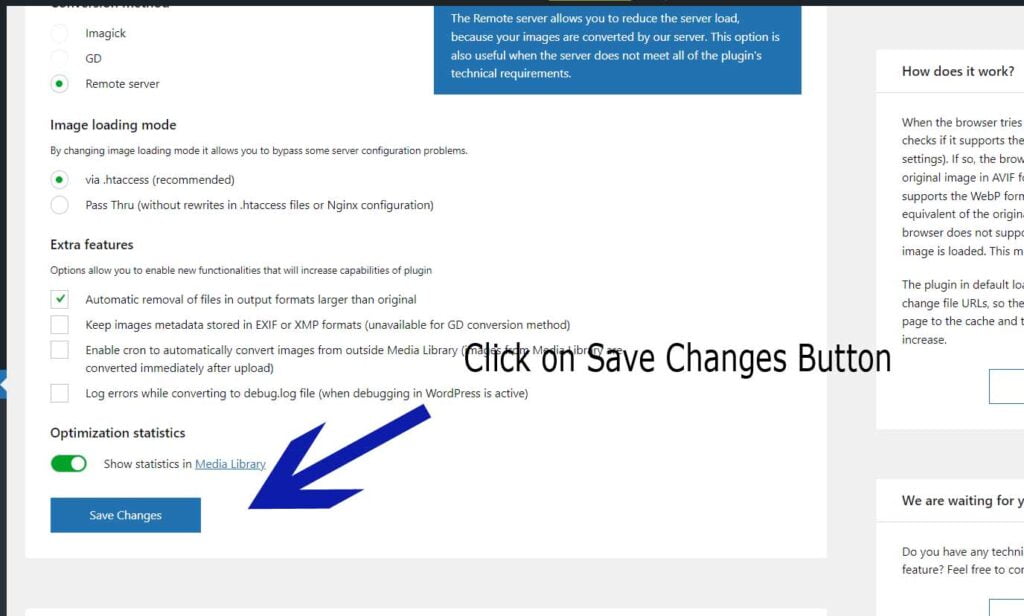
 The Extra features section contains some advanced configuration settings. If you’re unsure about any of the options, just leave the default values. Also now in Version 5.3.1 it shows list of files for optimization in tree form.
 If you’ve made any changes, click the “Save Changes” button.
3. How to Convert Existing Images
After installing the plugin, any new photos you upload will be automatically converted to WebP. But how about the pictures you already have? Scroll down to the “Regenerate pictures” section if you’re still on the WebP Converter page. Click the “Regenerate All” button with the “Force convert all pictures again” box unchecked.

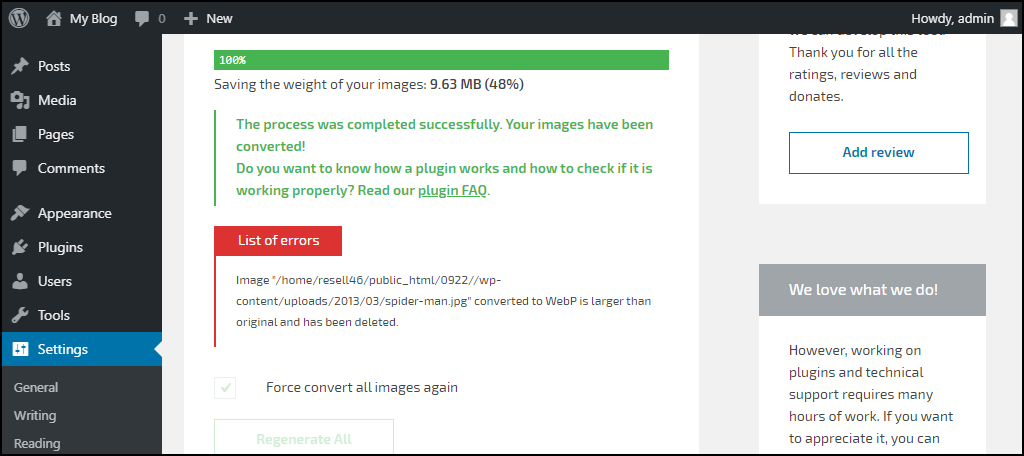
Upon completion of the WebP conversion, a success message will appear. But you might also spot mistakes.
The issue states that an image was converted by the plugin, however, the resulting WebP image was bigger than the original. So, the WebP file was removed by the plugin. So technically speaking, that is not an error. It’s also not a problem because, when necessary, the visitor’s browser will still receive the original photos. You will notice those faults more if you increase the “Images quality” setting. Such errors will occur less frequently the lower the “Images quality” percentage. Of course, the image quality will be lower if the percentage is selected.
4. The Results of the WebP Image Conversion
After the conversion, the WebP images that were generated are available on your site.
The original: 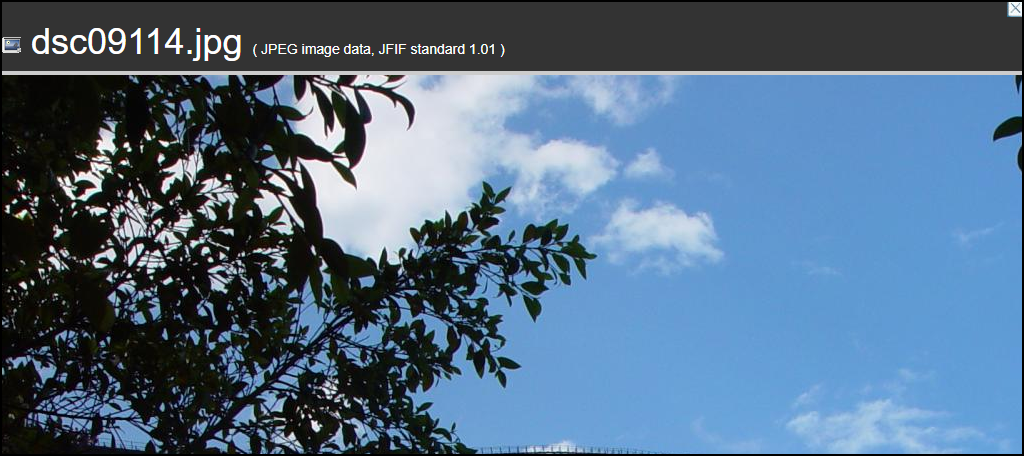 The WebP version:
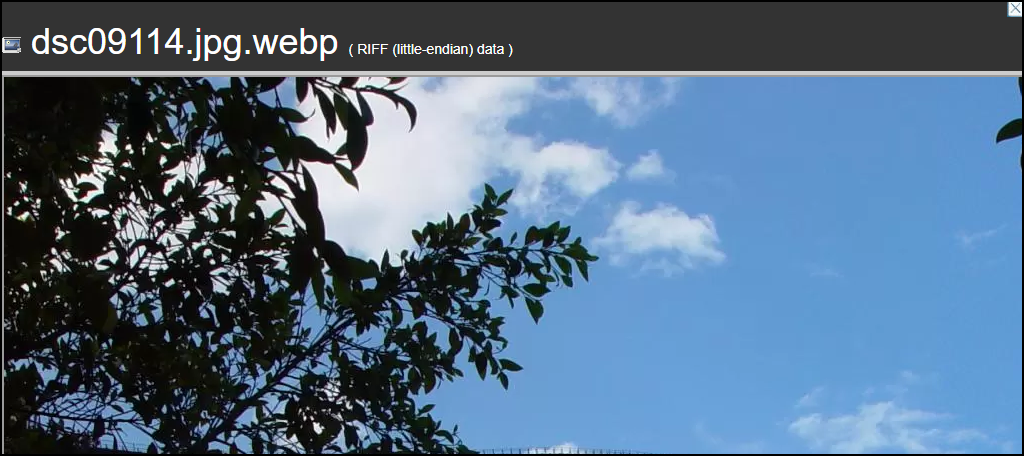
You don’t even need to be aware of the path of the new WebP picture or alter a thing. Everything is taken care of for you by the plugin.
5. What Happens if You Uninstall the WebP Converter Plugin
- Your website will stop serving WebP images once the plugin is deactivated.
- Your website will stop providing WebP images if the plugin is removed. The WebP images will also be removed from the /uploads-webpc directory. Make sure to download the WebP photos before erasing the plugin if you want to save a copy of them. After deleting the /uploads-webpc directory, it is impossible to recover the photographs.
No new database tables seem to be created by the plugin. Therefore, when the plugin is destroyed or uninstalled, no database cleanup is required. In the course of our use and testing, we discovered the aforementioned problems. There could be further problems that our testing missed.
Pros of Converter for Media Plugin.
Following are the benefits of using Converter for Media Plugin. The Media plugin website lets you check your website performance after the compression of pictures free and suggest how you can optimize your website and speed up the loading speed., you can check your website speed at the following link.
Test image optimization on your website
Seven-Day Money-Back Promise
Purchase your plan and try our plugin’s PRO version risk-free for 7 days. If it falls short of your expectations, you’ll get a complete refund.
Over 200 000 Satisfied Customers
There are over 200 000 satisfied users for Converter for Media PRO. check out some of the Feed Back from satisfied customers for Converter for Media PRO.
- Really managed to speed up several sites. Yet very easy to use. Everything is thought out to the smallest detail. Thanks to the developers @astrops
- Well done dude! Works even better than stuff like *** and paid plugins. No problem so far with the settings. Very efficient and simple to use! @webkatana
No Load on your server
It takes a lot of server resources to convert photos, especially for shared hosting. By using this technique, your server is not overworked while our server converts your photographs.
Fewer Technological Prerequisites
On some servers, either no library for converting files to WebP is present, or the library that is installed does not support WebP. You don’t have to be concerned about it when converting remotely.
Increased image conversion
Our server’s custom-configured image conversion tools enable us to convert images at a higher level. Better quality for your photographs is essentially what this means.
Do You Need a WordPress WebP Converter Plugin?
There is, of course, no simple solution to the questions of who needs this plugin and how much good it will do. Each plugin increases “overhead” by requiring more time to load and more server resources. That’s often a low overhead. However, if your website only features a handful of images, switching to WebP may not be worth the effort .htaccess rewrites do not give any overhead. .htaccess redirects work very quickly, so even in the case of a small number of images, it is worth doing it.
Depending on the degree to which you compress them (the “Images quality” % we discussed). As an example, WebP is not preferable for a photography website, where image quality is paramount. WebP’s main benefit is the reduction in file size, although this is achieved at the price of picture quality.
. WebP can benefit the majority of us, though, especially those who host huge images on their websites. WebP photos are well-received by Google (not surprising, given that it is their technology), but they do not affect search engine rankings. However, the website’s responsiveness is important, so any time savings in this area are welcome. Is the time finally right for you to switch to using WebP pictures? Where have you been stumbling? Are you considering giving this plugin a shot? Post your thoughts below. Sending me a message would make my day.
#5. Converter for Media – Free [No Performance Issues]
You can get Converter for Media from the WordPress plugins repository. It is a small plugin for optimizing images. It is a free plugin, and there is no paid version available. All of the images will be changed to WebP format and saved in a separate folder by the plugin. Aside from the images you upload through the WordPress media library, it can also work with images from themes and plugins. Both GD and Imagick can be used to convert files, but the plugin recommends using GD. The plugin will let you figure out how good the image is. 85% is the recommended grade (selected by default).
You can set it to a lower value (high compression level) or even choose a higher quality (less to no compression depending on your choice). You can tell the plugin to get rid of WebP files that are bigger than the original images. The plugin can also cache WebP images in browsers that can do that. You can even set up cron jobs so that every time you upload an image, it is automatically converted to WebP. Regenerate Image is a feature that will quickly process all of the images you uploaded before installing the plugin. The plugin can serve WebP images using either. htaccess rules or Pass-Thru, which does not change .htaccess rules or server configuration.
Performance
In terms of how well it works, the plugin is great. In our tests, there were no problems with the plugin. Only 230.66 KB of memory is used. That uses less memory than 99% of the plugins in the WordPress plugins repository. Also, it only takes 0.06 seconds longer for the page to load. The plugin also adds less information to the database. It doesn’t add any new tables, but it does add seven new lines to the wp-options file. WP Hive didn’t find any problems with compatibility. The test also didn’t find any mistakes. The plugin is safe to use in every way. It’s a small plugin that doesn’t use much memory and doesn’t make any mistakes. The plugin is reliable.
Frequently Asked Questions
Which plan should I choose?
Depending on how many photos you need to upload to your website, choose a bundle. Due to this limitation, each image can only go through one conversion (not one file in the Media Library). It will take into account all of the files on your website’s disc, including any photographs, as well as any additional sizes produced by WordPress.
WordPress automatically generates additional files of various sizes from a single submitted item, thus there may be a dozen or more files in the /uploads directory from a single image in the Media Library. In the configuration settings, you can see how many photos the plugin can handle at once.
You can choose between the free version and the pro version, the price for the pro version is 120,000 images per year For $50 / year with 2 months for free use. This is the most popular plan, we highly recommend it.
How many websites can one license be used on?
We have no secret boundaries. One license can be applied to as many websites as you like. The sole restriction is the maximum number of photographs you are permitted to convert in a billing cycle (further details on how to check this are provided in the question “Which plan should I choose? “). We have created the largest annual plans, which have a high image limit, specifically for these needs.
How often are the images converted?
All of the images on your website are transformed once the plugin is installed. Only once does this occur? Only newly added media library files are transformed as long as the plugin is enabled. Images that have already been converted do not need to be converted again or count toward your limit.
How much time does it take to convert images?
This procedure could take a few hours or longer. The number of photographs that need to be converted will determine the answer. Both the WebP and AVIF formats require a lengthy conversion process. Do not forget that your server is not overloaded. Our server operates in this manner, so please wait. Everything takes place in the background without altering how your website functions. All of the photos must be converted at once.
What happens if I don’t reach my limit?
The monthly image cap is not carried over to the following billing cycle. If you don’t utilise the entire limit, you’ll have a new limit available, identical to the one from the previous billing period, in the following billing period.
What to do if I exceed the monthly limit?
You won’t be able to use remote image conversion after this point. Initially, you can hold off until the billing period’s end. Your limit will thereafter be increased. Alternatively, you could cancel your current membership and get a new one with a different restriction.
Does the plugin modify the original images?
No, the plugin has no impact whatsoever on the source files. They are entirely secure. The plugin does not change your files; instead, it converts them to new formats like WebP and AVIF.
How are WebP and AVIF photos displayed on my website?
The plugin has no effect on the URLs. It performs an invisible redirect to an AVIF or WebP-formatted file. If the visitor’s browser supports AVIF, the image in AVIF format will be loaded rather than the original image. If it does not support AVIF but does support WebP, the image is loaded in WebP format. Alternatively, the original image is loaded for outdated browsers. The URLs for the photos on your website remain the same, but the MIME type of the image changes. This can be verified in the Network tab of your web browser’s Developer Tools. This is how the site appears without the plugin:
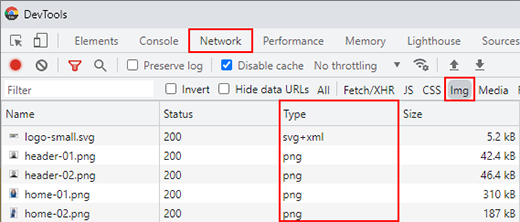
And so after installing the plugin and converting the images:
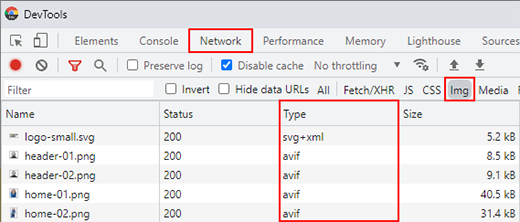
Also, note the difference in file size.
How does the 7-Day Risk-Free Trial work?
If the plugin does not match your expectations or does not perform properly within 7 days of purchase, they will return your payment in full. Returns are permitted in accordance with our Return & Refund Policy. To obtain this, simply contact them with an email indicating why you want to discontinue your plan. We will issue a refund once we have determined the cause of your cancellation. Please share extra information so that we can continue to improve the quality of our services.
Wrapping Up
There is no doubt that WebP is getting more and more popular. It can help your page load much faster, which makes the user experience better. Don’t forget that Google’s Page Experience algorithm, which will focus on Core Web Vitals, is about to be released. If your website doesn’t do well in Core Web Vitals, it will lose ground in the Search Engine Results Pages. You don’t want to be left out. Webmasters are putting WebP image format into use more and more. Most of your competitors have probably already done that. Time for you to do the same.
If you don’t want to use any of the above plugins, you can send WebP images through Cloudflare instead. To use Cloudflare’s WebP feature, you will need to pay for a paid account. If you are already using Jetpack’s Site Accelerator, you are already safe because it automatically changes all JPG and PNG images to WebP format. WebP is important, no matter what. Google won’t punish your website if you do it today. Google doesn’t like sites that take too long to load, and you can’t afford to have a slow site.
