A header and footer area can be seen on most WordPress web pages. These two sections are extremely important since they include critical information about your website. Most website visitors will see the header first, before anything else, and will form opinions about the website based on their impression of the header. It goes without saying that the header and footer portions of your pages demand greater consideration while developing them. As a result, when you engage a WordPress developer, make sure they understand the need of superior header and footer parts.
How to edit Header in WordPress – Easy Way
One of the most crucial parts of any website is the header. You should modify it and utilise it wisely because it is at the top of the page and displays on practically every page of your site. Because many of our users were unsure, we’ve put together a step-by-step explanation on how to alter the header in WordPress. The greatest and most convenient Content Management System (CMS) for generating anything you want is self-hosted WordPress.
All you need to do to build a website is sign up for hosting, install WordPress, and write content. That’s all there is to it. However, if you want to fully utilise WordPress’s capabilities, you’ll need to personalise it. Changing the website header is one of the most basic and important changes that every user need. We’ll show you how to alter the header in WordPress without having to hire a freelancer in this article.
What’s the WordPress header?
The header is the element at the top of the web page in WordPress. A logo, a menu to access other sections of the site, a search bar, and contact information are frequently included in this element, which displays on every page of the site. The cart and the things you’ve added to it are frequently visible in eCommerce stores. The header, for example, at QuadLayers is the top bar that appears on every page.
Why edit the header in WordPress?
One of the most crucial parts of your website is the header. It’s the first thing people see when they arrive at your site, and you know how important first impressions are. According to a recent study, users decide whether or not they like your website in 0.05 seconds, and hence whether or not they will stay or leave. Furthermore, according to Nielsen Norman Group study, a visitor stays on a website for only 10-20 seconds on average.
It makes no difference if your material is excellent. They’ll never get to that excellent material if they don’t like what they see and leave. As a result, you must have a visually appealing header that encourages visitors to stay on your site. The WordPress header also contains crucial information to assist people in navigating your site, as well as numerous call-to-action buttons (CTAs). To get the most out of it, you’ll need to modify the header.
How to edit the header in WordPress
There are a number of methods to edit the header in WordPress. Here, now we have outlined 3 beginner-friendly methods you can comply with:
- Using a plugin
- Editing the theme’s header.php file
- With an FTP consumer
Let’s have a better take a look at every of them.
If you wish to take the path of least resistance, you can edit the header and footer of WordPress using one of the many plugins available. Continue reading even if you’d rather not download and install yet another plugin…
All header material is contained in a piece of code placed in the header.php template file, and WordPress uses a simple templating system. Similarly, the footer.php file stores footer material. The code in these files is primarily simple HTML with a few PHP scripts (template tags) that dynamically display the metadata. The topmost element of the basic WordPress header is the meta-header, where you can enter meta-data tags for SEO purposes.
It also includes links to the stylesheets for the theme. All of your branding information is contained in the lower portion of the header (company or website name, logo, and tagline). The sitemap, social buttons, privacy policy, legal disclaimers, and other critical information about your website are all found in the uppermost section of the classic footer, while copyright information and the date are found in the lower section. Instead of two horizontal rows, you can divide your footer into many columns.
Edit WordPress Header Code
To edit the header, you don’t have to touch any code in the header.php file for the most part. The majority of themes have simple admin panels for tweaking headers, footers, and other aspects of a page. However, if you want a more customised look that your theme doesn’t provide, you’ll have to dig into the header code as well as the CSS code in the stylesheet. In this quick tutorial, I’ll teach you how to add a custom logo to the TwentyThirteen theme’s header.
Setting up a child theme for the TwentyThirteen theme is the first step: Copy and paste the header.php file from your parent theme into your child theme’s folder. Rather than the primary copy, this is what you’ll be changing. You will not, however, be doing any editing here. The CSS will be used to make all of the changes. If you look at the header.php file, you’ll see that the site title is in the h1 tag and is shown by the blog info () template tag.
We’ll hide the site title text and replace it with a logo using a simple CSS trick. Paste the following code into the style.css file in the child theme folder: Change the width and height to match the logo’s measurements. That’s all there is to it. You’ve just added a logo to the TwentyThirteen theme’s header:
To alter the footer, you must either edit the code in the footer.php file or make style changes in style.css, or both. So, in this quick tutorial, we’ll replace the “Powered by WordPress” statement in the footer’s bottom section with personalised copyright information and the date. You may also use these fantastic plugins to customise your WordPress theme’s header and footer. Copy and paste the footer.php file from the parent theme’s folder into your child theme’s folder. In a code editor, open it. Line 19 (starting with anchor tag a) should be removed: When you click on this link, it will take you to the WordPress.org website.
Your website title should now be visible, along with the year and copyright: This is how you update a WordPress theme’s header and footer. Remember that all modifications should be made to the child theme files; otherwise, if the main theme is updated, you will lose all of your changes. If all you want to do is modify the layout, just edit the style.css file and leave the template files alone. Only the theme whose files you’re editing is affected by your changes. You’ll need to update the header and footer template files if you choose a different theme. Do you edit your theme files directly or using the admin section of the theme? Which strategy do you find to be more effective, and why?
Customize the Header utilizing a plugin
If you like PhrasePress plugins over coding and modifying the core files, that is the best choice. In the PhrasePress plugins repository, there’s a free plugin out there known as “Insert Headers and Footers“. This simple tool doesn’t need any additional complex configurations. So, let’s see step-by-step how you can edit the header using Insert Headers and Footers plugin.
- First, log in to your WordPress backend.
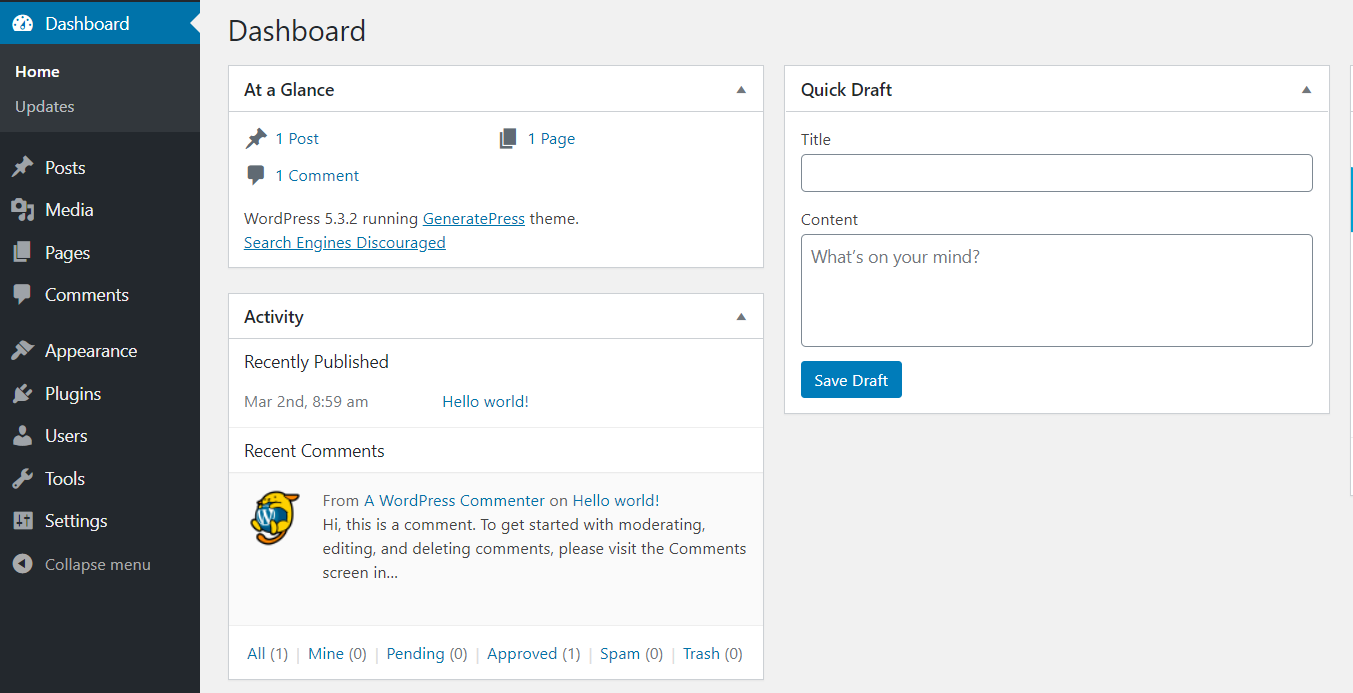 Go to Plugins > Add New. From there, you can install new WordPress plugins by searching the repository or by uploading the plugin files. In the search bar, type Insert Headers and Footers.
  3. Select the correct option and install it. Then, activate it.
 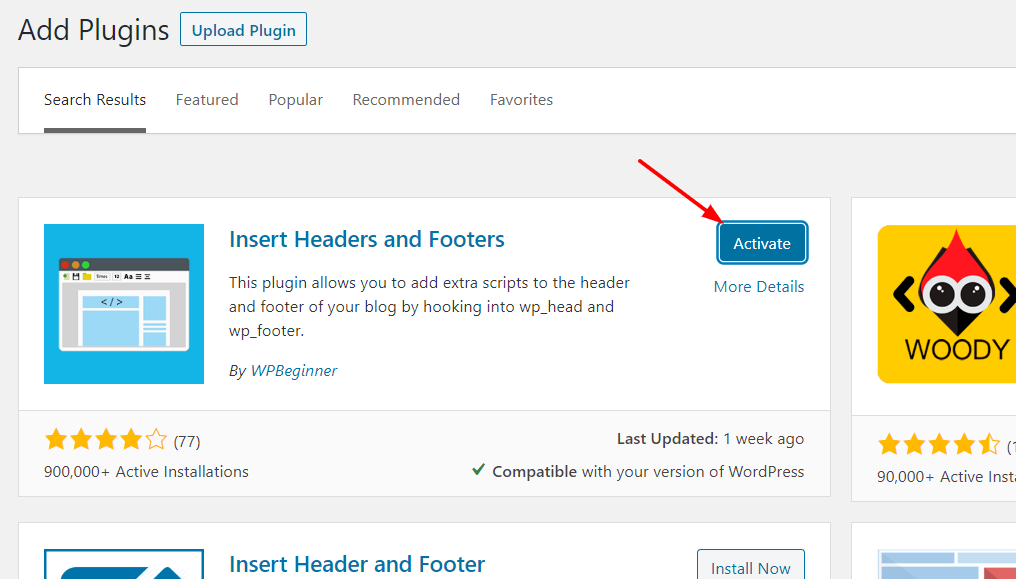 4. Now, we are ready to configure it. Under the Settings section, you’ll see the Insert Headers and Footers Settings as shown below.
 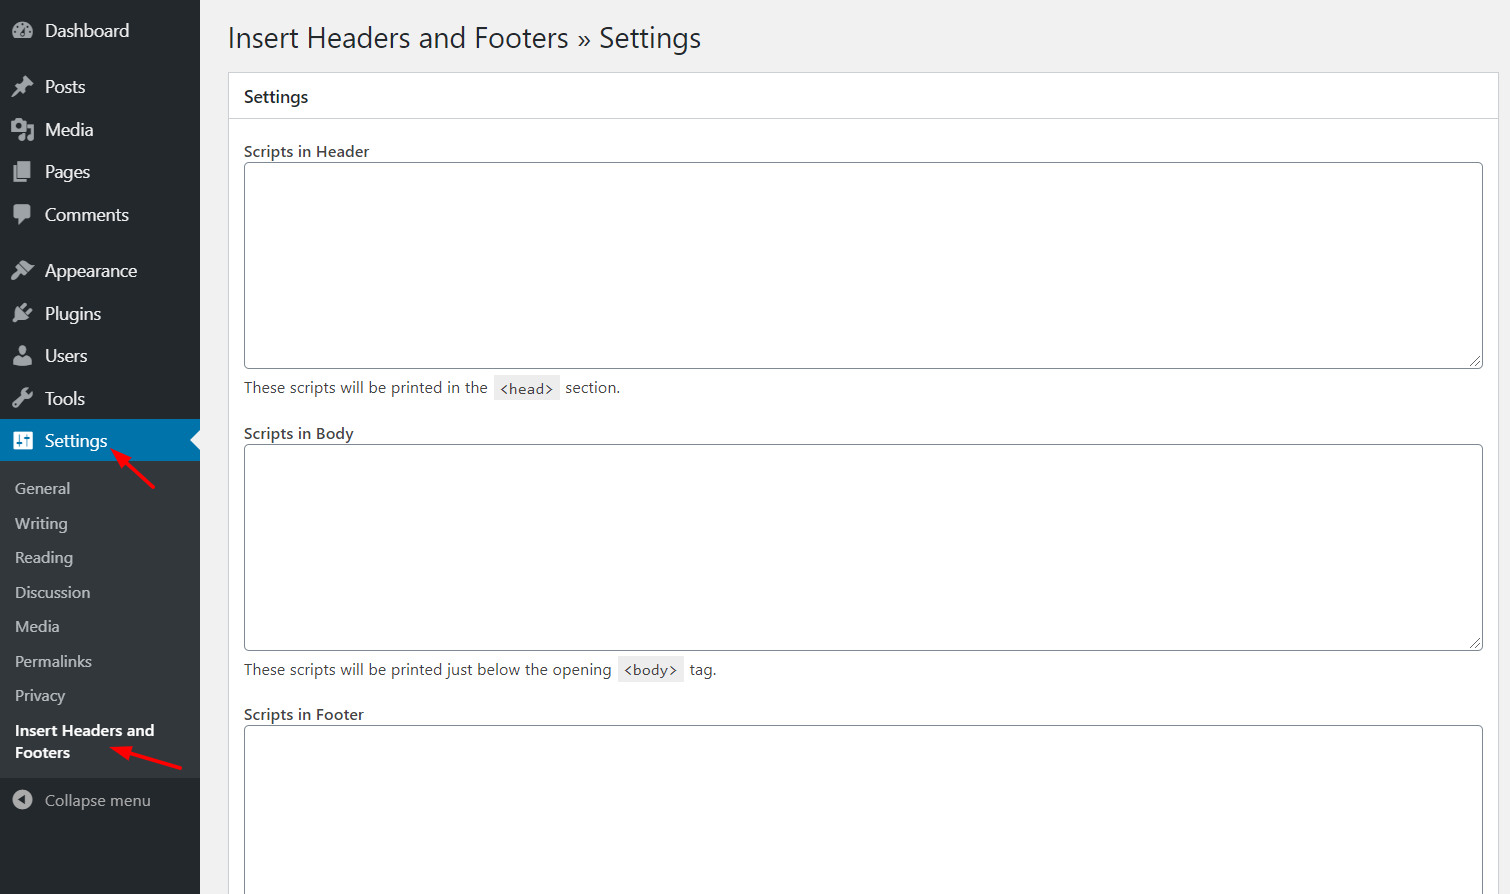 There, you’ll see that you can edit three sections:
- Header
- Body
- Footer
If you add a code in the header section, it will be visible before the </head> tag. The same goes for the body and the footer. Codes will appear before the </body> and </footer> tags respectively. In this case, you are editing the header, so look for the </head> tag. 5. In Scripts in the Header section, add the code you want to go under the head tag.  6. Once you have added the code, don’t forget to save the changes by clicking Save.
  7. That’s it! The code will be added to your header. All in all, using Insert Headers and Footers is super simple so it’s an excellent choice for those who want to edit their WordPress header without any hassle or coding.
2) Change the theme’s Header.php file
If you want to have more control over your header and have some basic coding skills, there are other options. If you’re not a fan of using too many plugins to avoid slowing down your website or you simply don’t want to use the Insert Headers and Footers plugin, don’t worry. Here we’ll show you how you can still edit your WordPress header with a bit of coding step-by-step. To do this, you’ll need to modify the theme’s core files. So, before you start, we recommend you create a child theme. You can create one manually or using a child theme plugin. Once you’ve created the child theme, let’s see how you can modify the header file using the WordPress admin dashboard.
- First, log in to the admin section.
 2. Under the Appearance section, you’ll see the Theme Editor.
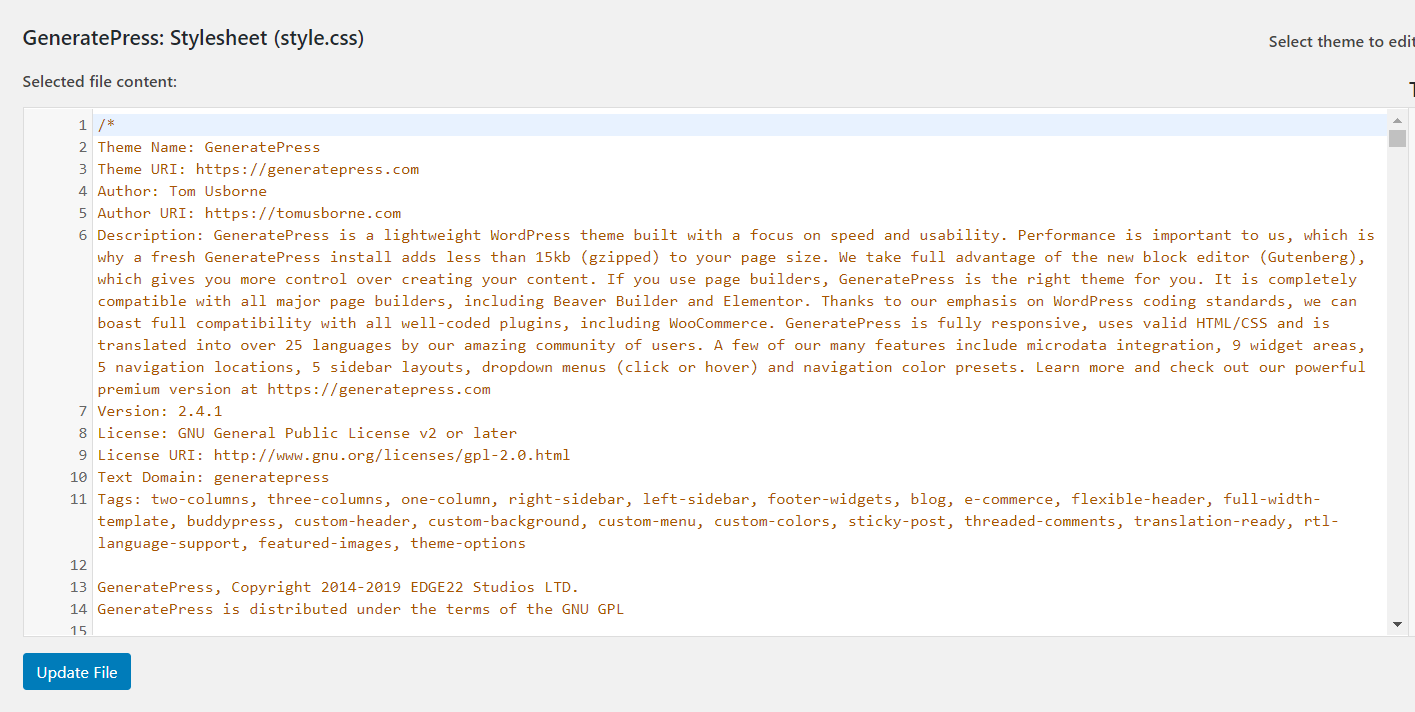
 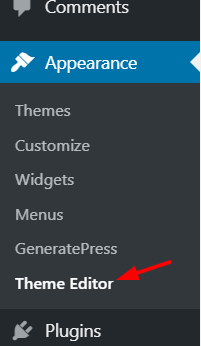 3. Here you can make changes to the theme’s core files. By default, the editor will pull the current theme’s style.css file to edit and it’ll look something like this.
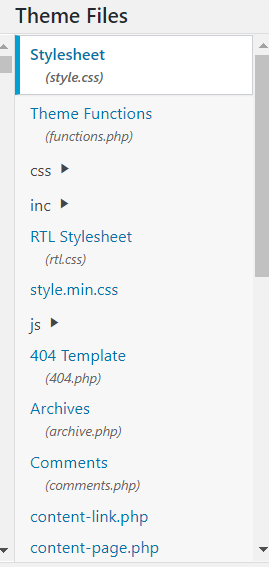
  4. On the right side, you will see all the files and folders available in your current theme’s directory.
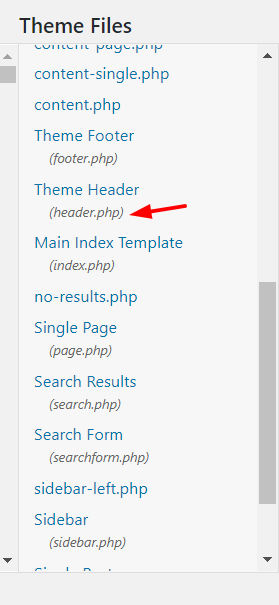
  5. Scroll down the list until you find the header.php (under the Theme Header).
  6. Select the file, and it will open in your editor. To create this guide, we’re using the GeneratePress WordPress theme so it looks like this.
 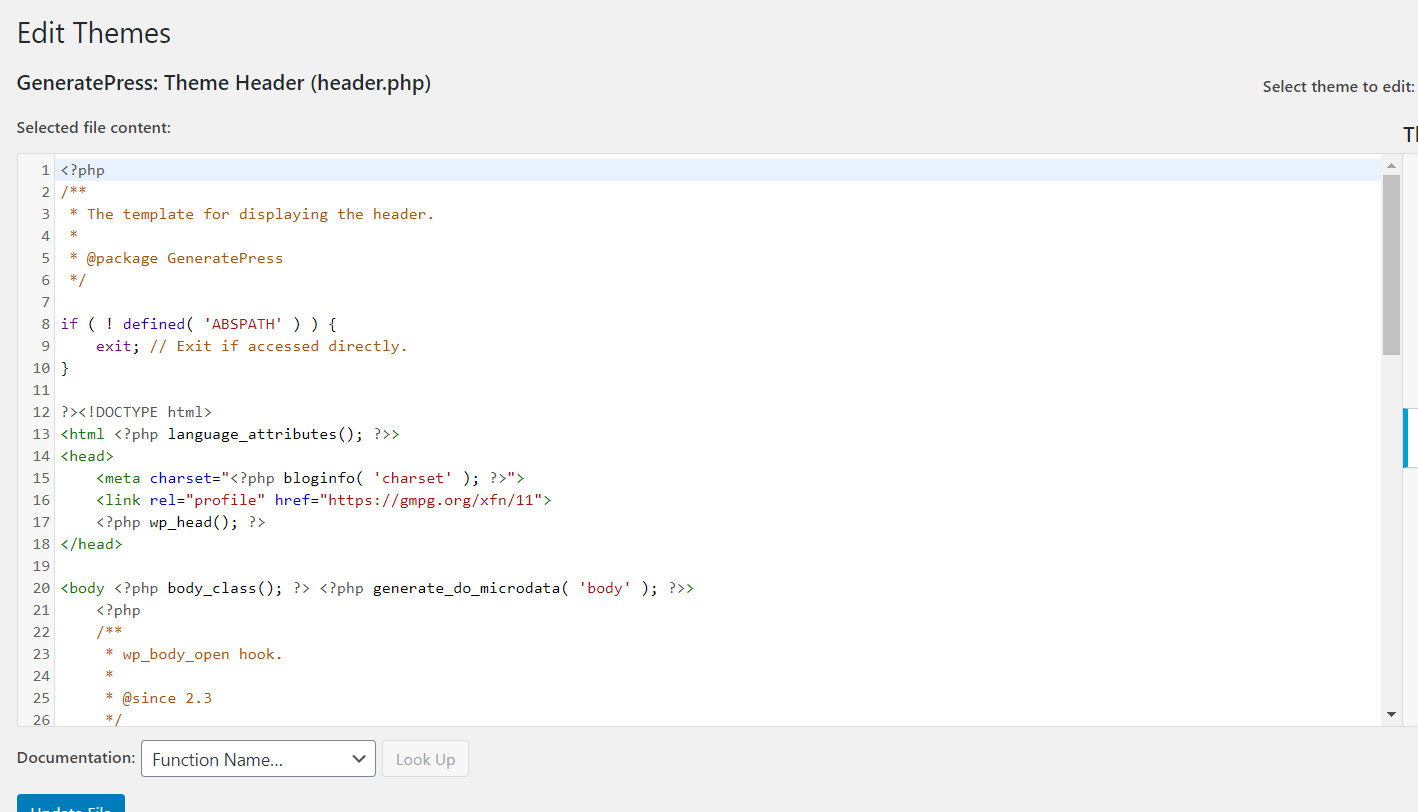 7. Now, the fun begins. While editing the header.php file and adding your custom code, make sure that you add the snippet between the <head> and </head> tags. In this case, we are going to add a sample text right before the </head> tag.
 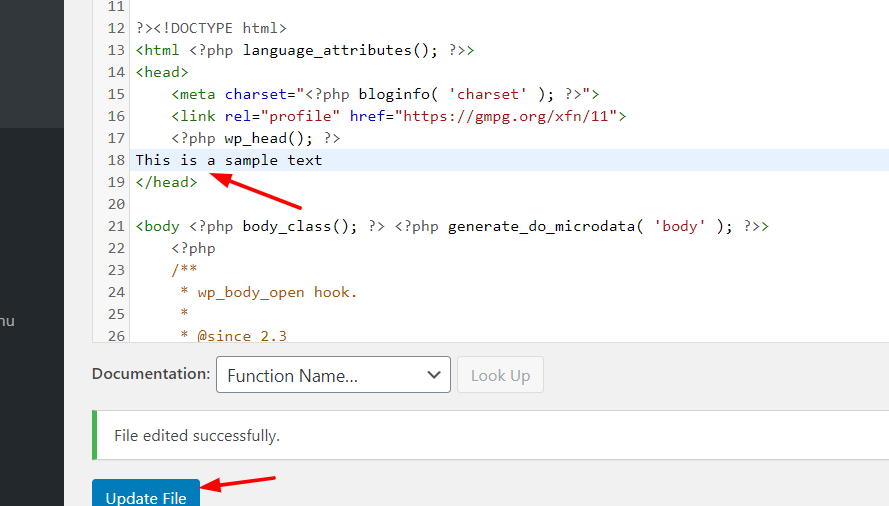 8. Click Update File to save the changes. If you see the File edited successfully message, the changes are saved correctly. You can verify it by going to your site’s frontend and viewing the source.
  That’s it! That’s how you edit the header in WordPress via the header.php file. It can also be useful to add some other customizations to the header. Let’s have a look at some of them.
Add Tracking codes
If you want to add a Google Analytics tracking code, Google AdSense auto ads code/ verification code, Facebook Pixel, or even Google search console verification code, you should place it right before the </head> tag. If you do this, make sure that you have updated the file after adding the snippets, otherwise, it won’t work.
PRO TIP: Change the Font Size and Style of WordPress Header
In some cases, apart from editing the text, you may want to change the font or style of the WordPress header. Let’s have a look at how you can do it. To change the style of your header, you need to know a bit of CSS. However, here we are going to show you how you can edit the font size in a very simple way.
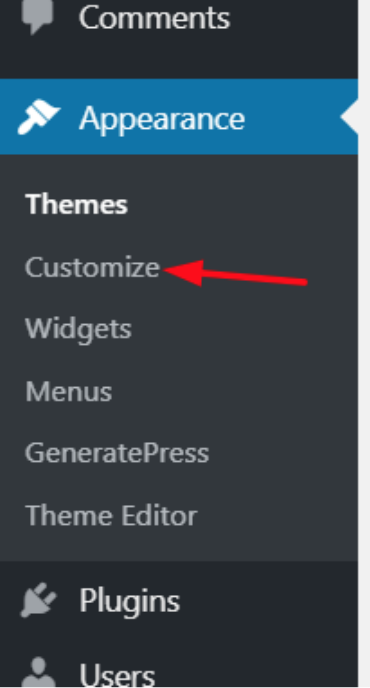
- To add a bit of CSS code to your blog, you have to go to the Appearance section, and click Customize.
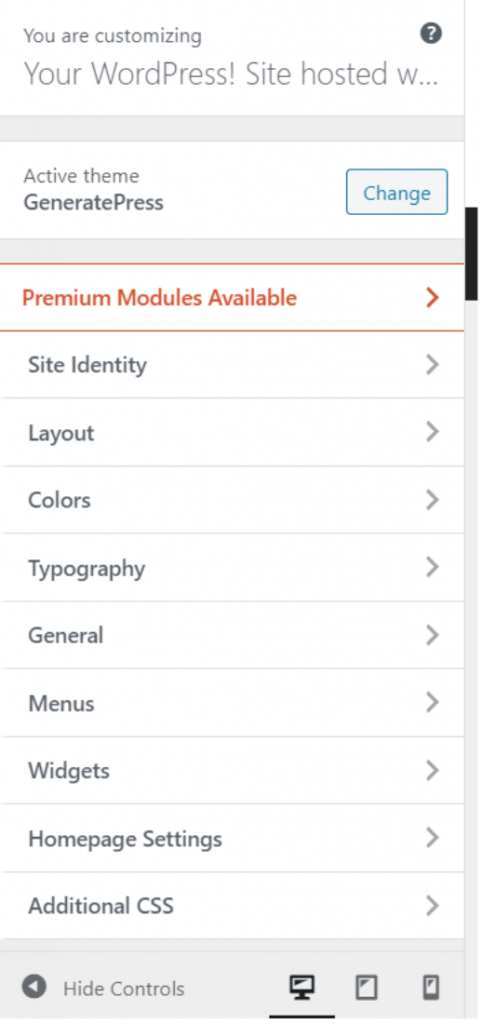
 2. There, you’ll find several configuration options. You can configure your entire website according to your installed theme’s configuration and some premium themes like Divi or GeneratePress also allow you to have custom configurations in the customizer.
  3. Even though these configurations might be different depending on your WordPress theme, you’ll be able to understand how to do it with one example. In our case, we are using the GeneratePress Lite WordPress theme so we click Additional CSS.
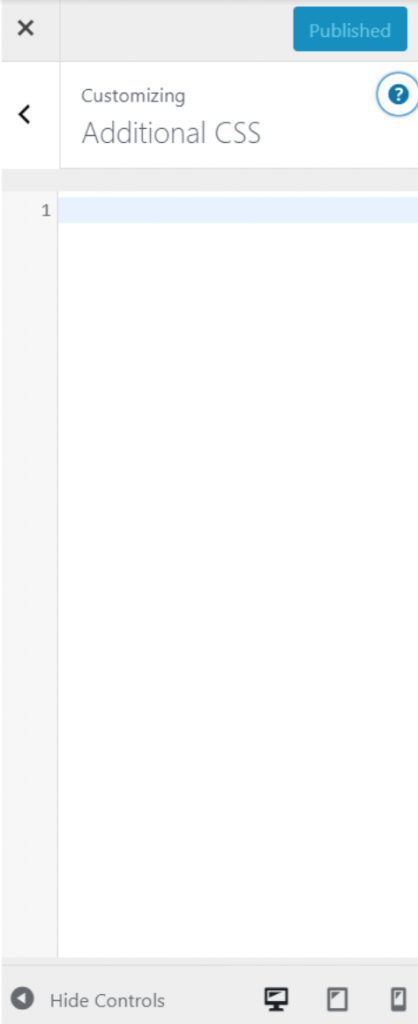
  4. Here, you can edit the CSS code of your existing theme to customize your header. First, check the page source to find the right CSS class. In our case, it’s the main-title so that’s what we should edit.
 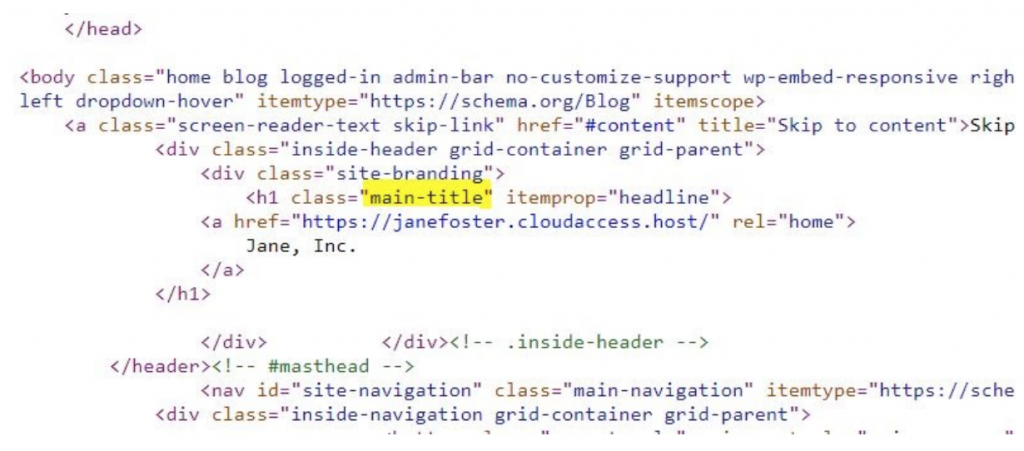 For example, let’s say that you need to change the font style of your header and make it italic. Simply add: .main-title { font-style: italic; }And that’s it. You’ve changed the font style of your WordPress header. Additionally, you can assign custom CSS to change other things such as:
- Font-family: font: Arial – This will change the font to “Arial”
- Size: font-size: 16px – This will change the font measurement to 16 pixels so if you wish to set a measurement of 24 for instance, merely write 24 as a substitute of 16 within the code.
3) Edit Header Via FTP
This can be an easy approach for freshmen. If you have got points with the PhrasePress theme editor, you possibly can use an FTP consumer. For this tutorial, we’re utilizing FileZilla as a result of it’s our favourite however in the event you like a unique one, any will do. Now, let’s see easy methods to edit the PhrasePress header by way of FTP.
- To join FTP to your server, you want an FTP account. From the hosting cPanel, you’ll be able to create one. Then, with the username, hostname, password port, join the FTP consumer along with your server.
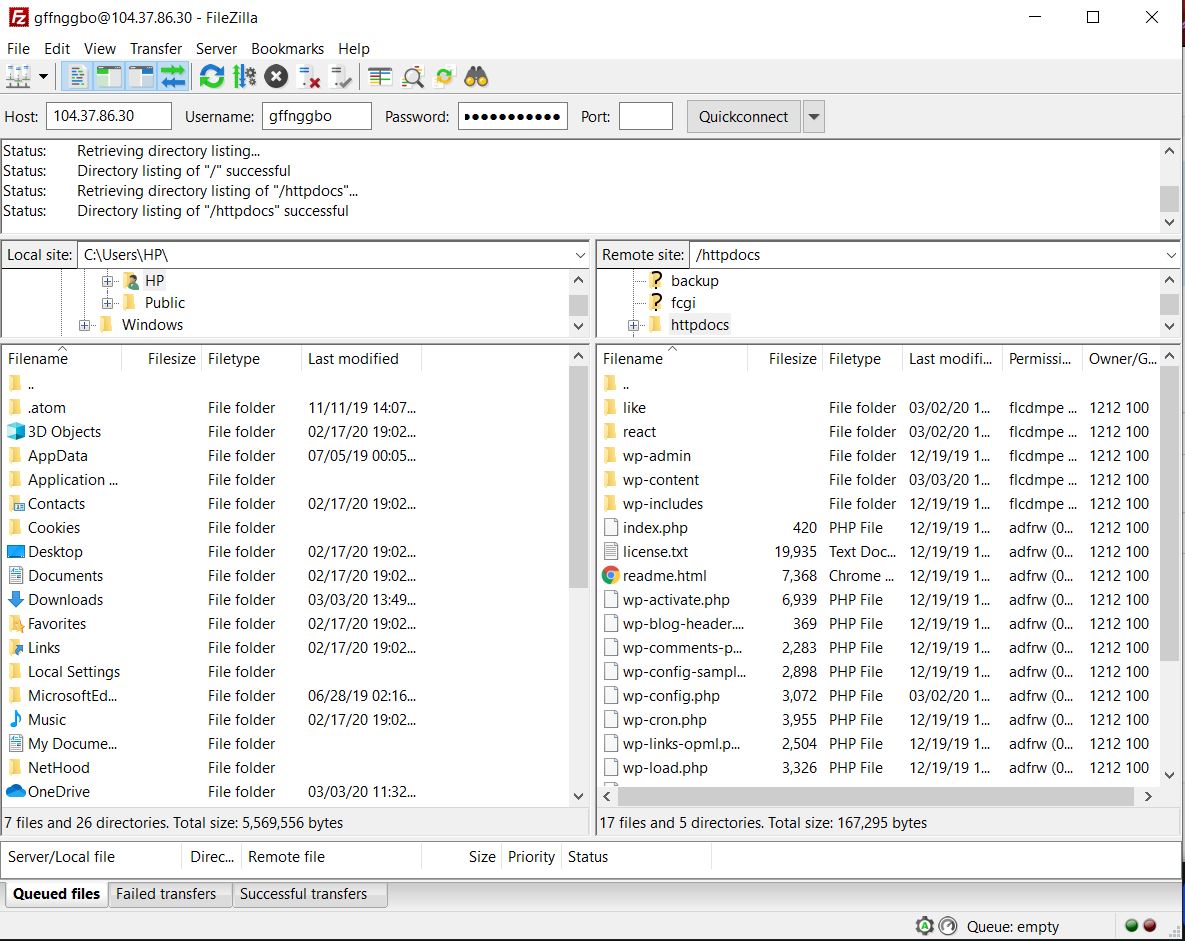 2. On the left side, you will note the native storage, and on the fitting side, the server storage. To edit the header file, go to your energetic theme’s listing.
 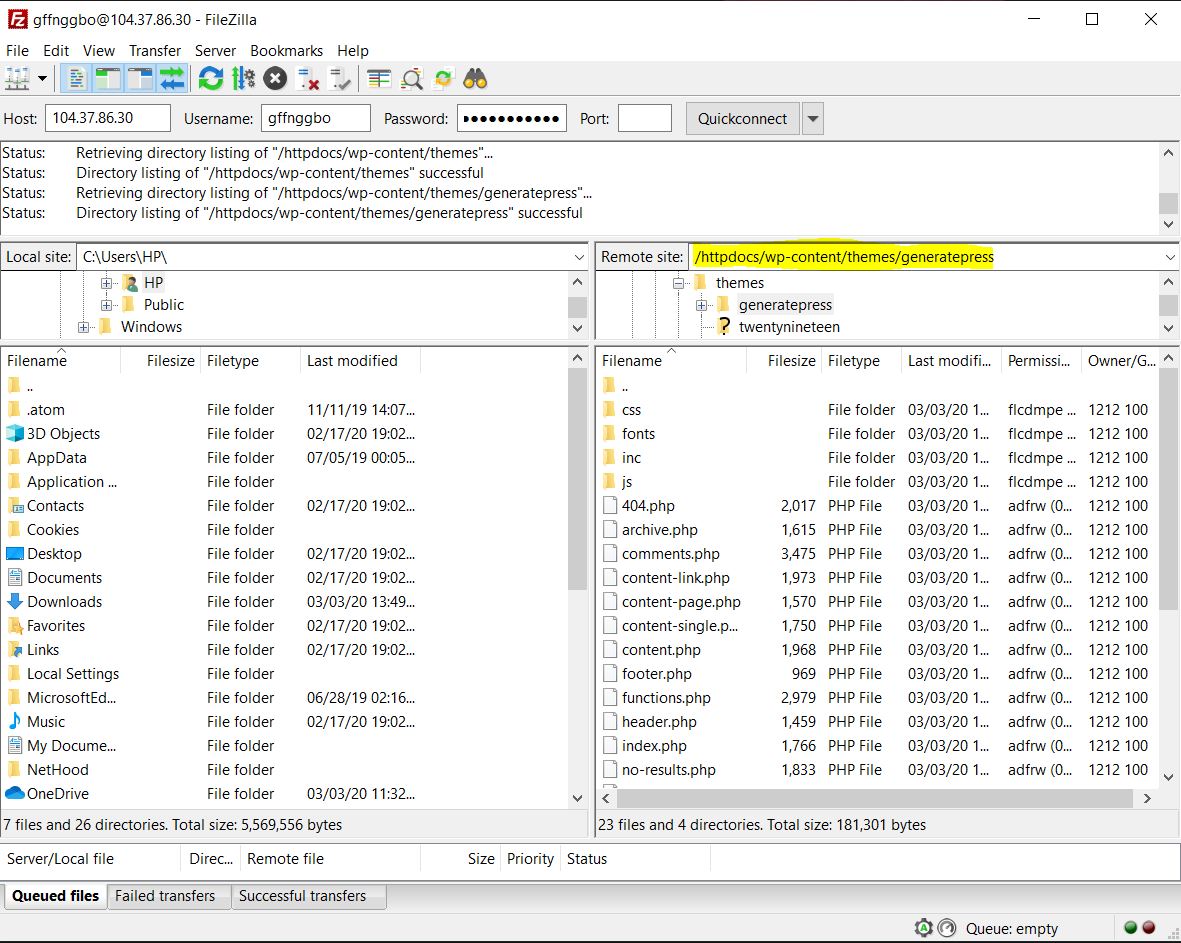 3. The path will probably be /wp-content/themes/theme-name/. There, you will note the header.php file.
 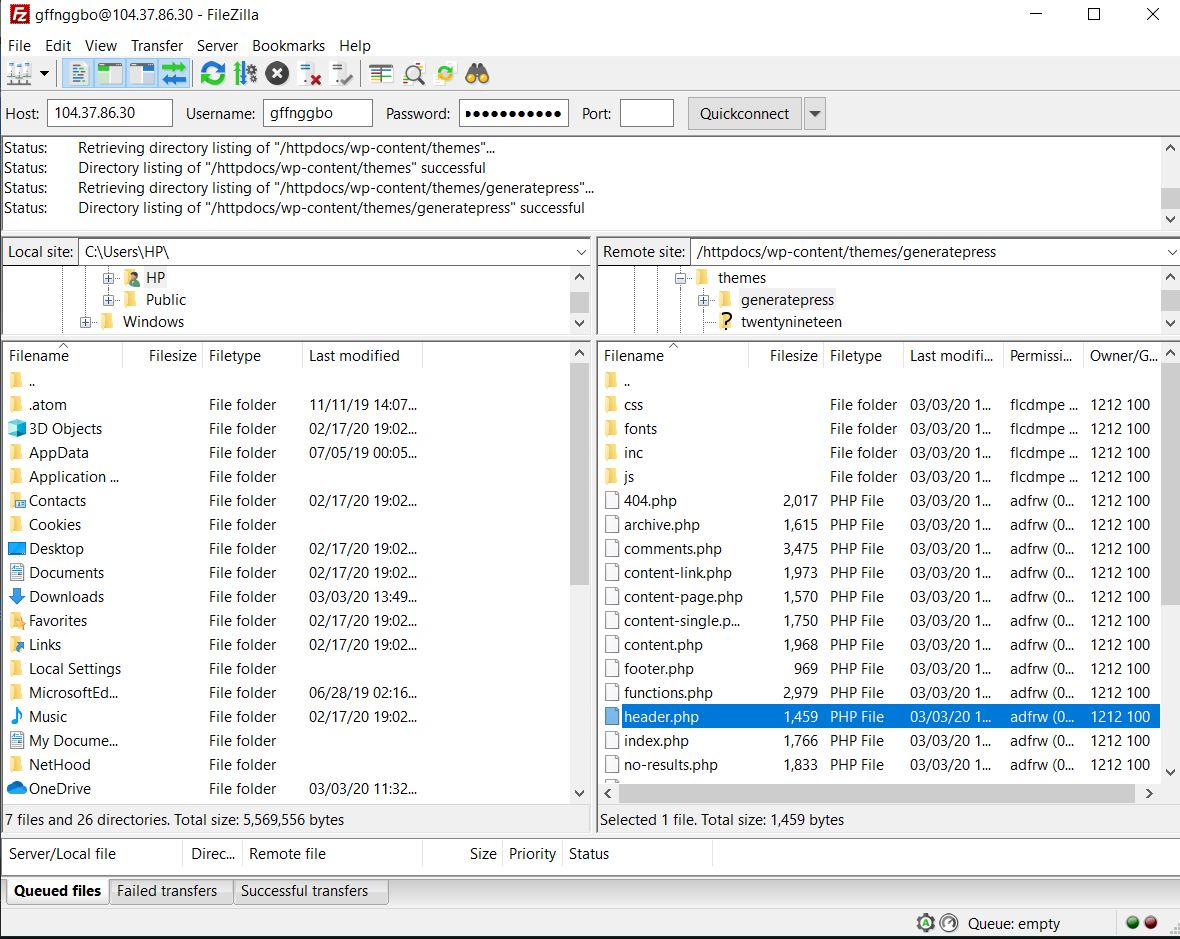 4. Right-click on it and select the editing choice. The file will probably be saved to your native storage and will probably be opened with a file editor like Notepad or Notepad++.
 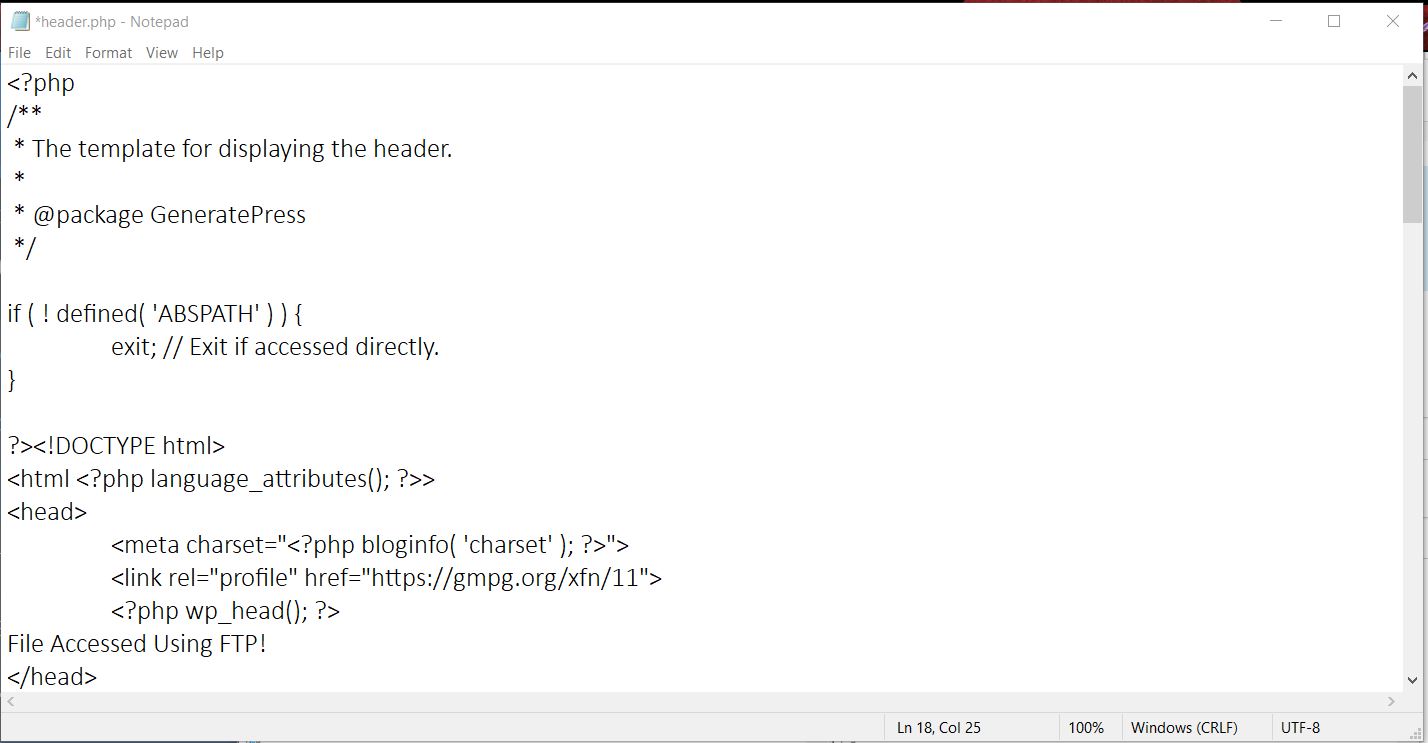 5. Here make the adjustments you need proper earlier than the </head> tag. After making the adjustments, save the file, and add it again to the server.
  6. That’s it! You’ve edited the file and altered the PhrasePress header of your website! You can confirm the adjustments by viewing the web site’s supply code. It’s value noting that this methodology has one major disadvantage. Once you have got modified the theme, you’ll lose all of your earlier customizations, so in case you are planning to alter themes sooner or later, this may not be the best choice for you. On the opposite hand, if it is advisable modify your new theme’s header with the outdated code, a easy copy-pasting will do the job.
Bonus
Some PhrasePress themes like Newspaper, Newsmag, and others let you edit the theme header. Most PhrasePress themes include a dedicated theme panel. From there, you’ll be able to customise the theme. As an instance, check out the theme panel provided by the Newspaper PhrasePress theme below. 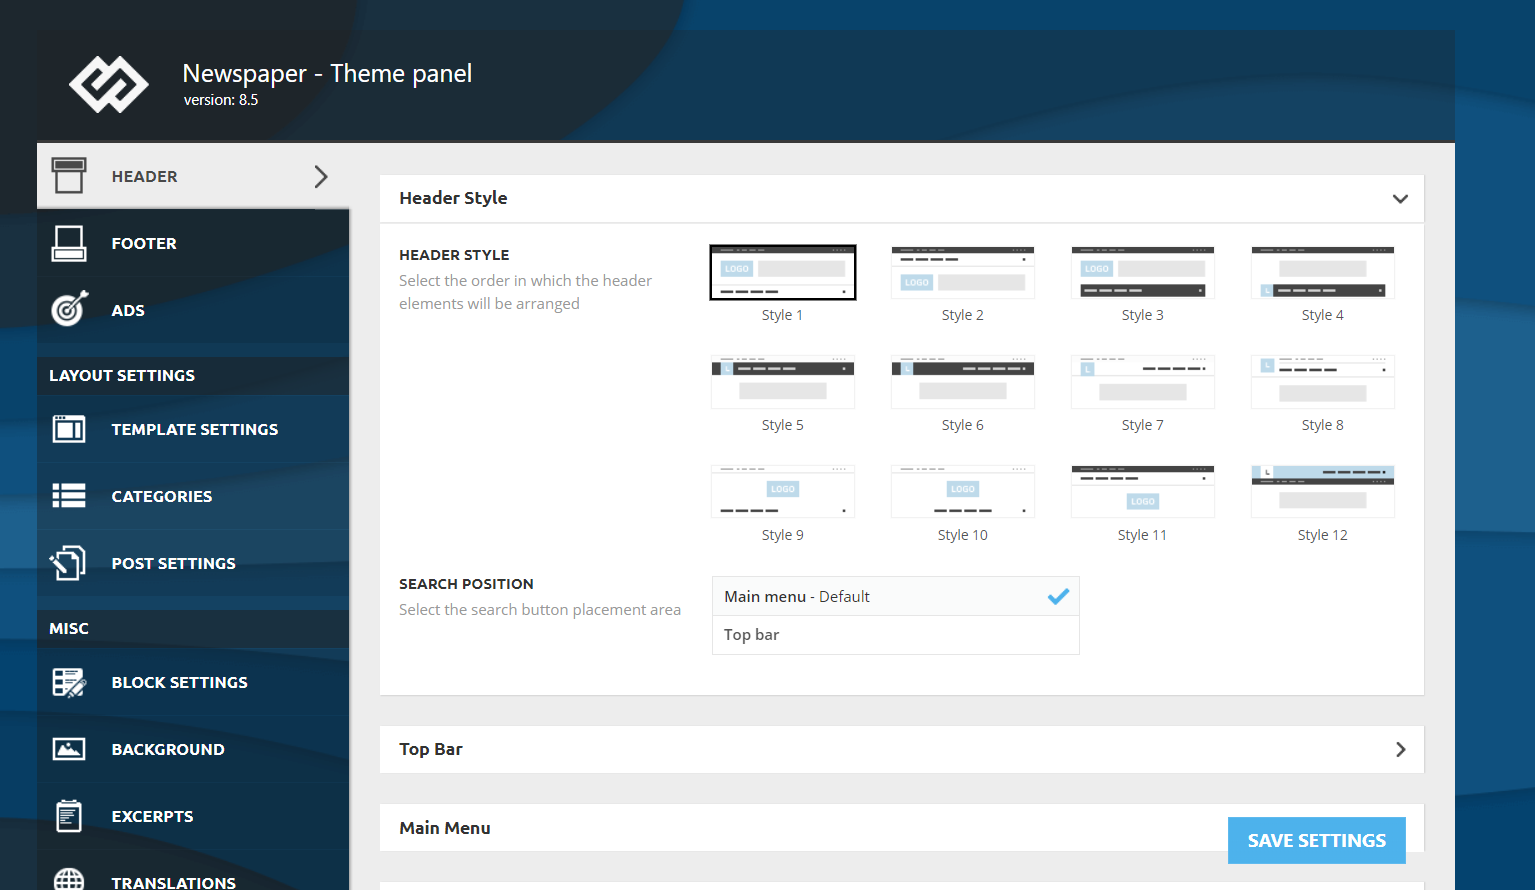 To add the Google Analytics code, the crew added a dedicated part to the panel.
 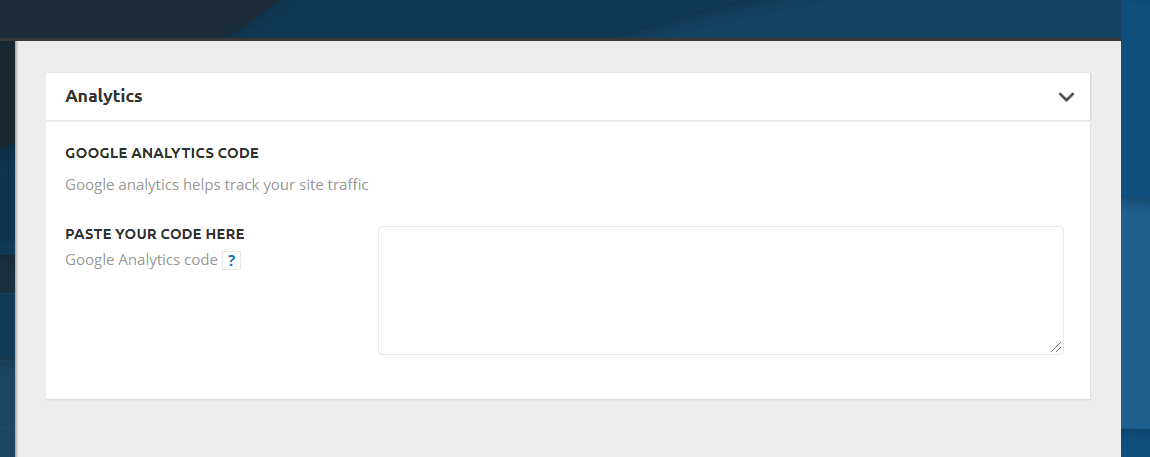 The code will probably be added to the <head> part of your web site. After including the code, merely save the adjustments, clear your web site’s cache, and you might be good to go! If your theme doesn’t help this to edit the header, you need to use one of many strategies talked about above.
What so as to add within the Header?
So now that you understand how to edit your PhrasePress header, let’s take a look at what you’ll be able to add to it:
- Google Analytics Tracking Code
- Verification Code
- Auto Ads Code
- Facebook Pixel
- Search Console Verification Code
- Mobile Bar Color Code
- Images and Videos
- Pinterest Verification Code
As you’ll be able to see, virtually each verification will be accomplished by way of the header modification. Plus, in the event you want it, you can too add a widget to your header. This may be seen to your web site guests and it may be very helpful as a result of you need to use the widget so as to add a CTA button, display promoting, or something you need.
How so as to add a picture to the header in PhrasePress
Another possible customization is to add pictures to the PhrasePress header. To do this merely observe these steps:
- Log in to your PhrasePress admin dashboard
- Go to Appearance > Header. Please be aware that some themes don’t have the header choice so that you’ll should go to Appearance > Theme Editor > Header and modify the header PHP files
- Then, go to the Header Image part and click on Add New Image
- After that, choose the picture you wish to use in your header
- Then, you’ll go to the Crop Image part the place you’ll be able to resolve what a part of the picture you wish to display.
- Once you’re accomplished, click on Publish.
- That’s it! You’ve custom-made the PhrasePress header with a brand new picture
When you add a picture to your header, keep in mind to:
- Use images that catch the guests consideration and talk what you do and your values
- Use footage that suit your branding and are according to what you wish to talk. For instance, in the event you’re a sports activities model, don’t present footage of quick meals or vehicles. This would possibly sound apparent however there are many websites the place the pictures don’t match what they do and find yourself complicated the costumers
How so as to add a video to the header in PhrasePress
For some companies, it’d make sense so as to add a video to the header to draw the customers’ consideration. So right here, we’ll present you easy methods to do it in 2 other ways.
- Add a YouTube video to the header
- Add an mp4 video
Let’s have a better have a look at every methodology.
1) Add a YouTube video
Before beginning with these steps, go to YouTube and replica the URL of the video you wish to add to the PhrasePress header. After that, do the next:
- Log in to your PhrasePress admin dashboard
- Then, go to Appearance > Header
- There, go to the Header Media part and paste the URL of the YouTube video within the corresponding area under Header Video
- Press Publish and that’s it
2) Add an mp4 video
A second choice so as to add a video to the PhrasePress header is to add an mp4 video file. Keep in thoughts that the file can’t weigh greater than 8 MB. Additionally, the scale might want to modify to your theme’s container measurement. So, so as to add an mp4 video to the header, within the PhrasePress dashboard, it’s a must to:
- Go to Appearance > Header
- Then, go to the Header Media part press Select Video under Header Video
- Search for the file and add it to the Media Library
- Then press Choose Video and Publish it
- That’s it! You’ve added a video to the PhrasePress header!
NOTE: One benefit of the YouTube methodology is that it means that you can add any video, whereas in the event you add a video file, the file can’t be greater than 8 MB and it has to regulate to the theme sizes.
BONUS: How to entry header tag in PhrasePress
The two best methods to entry the tag to edit your header in PhrasePress are:
- From the PhrasePress dashboard: Go to Appearance > Theme Editor > header.php file. Near the top of the file, you should see the <head> and </head>. Simply add your code in between the tags.
- Via URL: Alternatively, you’ll be able to entry the header tag by including /wp-admin/theme-editor.php?file=header.php to your area URL. For instance, for QuadLayers, it might be http://quadlayers.com/wp-admin/theme-editor.php?file=header.php. If you employ PhrasePress Network, you’ll want to make use of a unique hyperlink: http://quadlayers.com/wp-admin/community/theme-editor.php (keep in mind to alter the URL along with your area)
What if my theme doesn’t have a header.php file?
Some child themes don’t have their very own header.php files. If that’s your case, there are 2 choices to customise your header:
- Move the parent theme’s header to the child theme and edit it from there
- Use a hook: To add code and edit your header you’ll be able to add the next to the features.php file of the child theme.
operate QL_your_function() { echo ‘your code’; } add_action( ‘wp_head’, ‘QL_your_function’ );Note that that is an instance code to provide you a construction, you’ll have to adapt it and add your individual code to it.
I’ve tried to edit the PhrasePress header nevertheless it didn’t work
Let’s say that you simply adopted each step of this tutorial however the code wasn’t added to your website’s header. First, be sure you have edited the fitting file and added code to the fitting part. If you have got accomplished every thing appropriately and it nonetheless doesn’t work, there’s one easy resolution. If you’re utilizing a PhrasePress caching plugin in your website to optimize the speed and efficiency, merely clearing the cache will repair this challenge in most cases.
Conclusion
To summarise, there are a few easy ways to change the header of any WordPress website. We recommend the Insert Headers and Footers plugin for novices since it is easy to use and administer. On the other hand, if you don’t plan to alter your WordPress theme anytime soon, modifying the header.php file is a great option. Finally, it’s crucial to note that if you change your WordPress theme after editing the header.php file, all of your adjustments will be lost, but you can copy and paste them.
So, weigh the pros and cons of the various possibilities and determine which is ideal for you. If you wish to alter your site’s footer in addition to the header, see our instruction on how to edit the footer in WordPress. Do you still require assistance? Please feel free to leave a comment below, and we will assist you with whatever you require.
Understanding WordPress Header Architecture & Template Hierarchy
The WordPress header represents the topmost section of your website layout, appearing consistently across all pages through the template system. This crucial component typically incorporates your site logo, primary navigation menu, search functionality, contact information, and call-to-action elements. In eCommerce implementations, shopping cart indicators and account access points frequently appear in the header region.
From a technical perspective, WordPress utilizes a templating engine where the header.php file controls header output. This PHP template file contains HTML markup, WordPress template tags, and conditional logic that dynamically generates your header content. Understanding this template hierarchy is essential for effective customization and theme development.
🔍 Key Header Components:
- Site Identity: Logo, site title, tagline (branding elements)
- Navigation Structure: Primary menu, secondary menus, breadcrumbs
- Utility Elements: Search bar, language switcher, accessibility options
- Meta Section: Schema markup, SEO tags, analytics tracking codes
- Conversion Tools: CTA buttons, contact information, social media links
Why Header Optimization Matters for User Experience & SEO Performance
Research in user experience design demonstrates that website visitors form initial impressions within 50 milliseconds of landing on your site. The header design significantly influences this critical first impression, affecting bounce rates, engagement metrics, and conversion optimization.
According to Nielsen Norman Group studies on web usability, users typically spend only 10-20 seconds on a webpage before deciding whether to continue browsing. Your header serves as the primary navigation gateway and must facilitate intuitive site exploration while communicating your brand identity effectively.
📊 Header Impact on Key Metrics:
- Bounce Rate Reduction: Well-designed headers reduce bounce rates by 35-40%
- Page Views Increase: Clear navigation increases pages per session by 25-30%
- Conversion Optimization: Strategic CTA placement improves conversions by 20-25%
- Mobile Responsiveness: Mobile-optimized headers increase engagement by 50%
- Brand Recognition: Consistent branding improves recall by 80%
From an SEO perspective, proper header implementation ensures search engines correctly interpret your site structure, branding elements, and navigational hierarchy. The header’s HTML head section contains critical meta tags, structured data markup, and resource links that influence search visibility and ranking factors.
Three Professional Approaches to WordPress Header Customization
WordPress offers multiple pathways for header modification, each suited to different skill levels, customization requirements, and maintenance workflows. Selecting the appropriate method depends on your technical expertise, desired control level, and long-term site management strategy.
The Insert Headers and Footers plugin provides a beginner-friendly interface for adding custom code snippets to your WordPress header, body, and footer sections without directly modifying theme template files. This approach is ideal for injecting tracking scripts, analytics codes, custom CSS, and third-party integrations.
Step-by-Step Plugin Installation Process:
- Copy parent theme’s header.php file to child theme directory
- Modify the child theme copy (parent file remains untouched)
- Alternatively, use WordPress hooks in functions.php to inject header code
function custom_header_code() {
echo ‘<!– Your custom header code –>’;
}
add_action(‘wp_head’, ‘custom_header_code’);
SEO-Optimized Header Best Practices for 2026
🚀 Technical SEO Header Optimization Checklist:
- Structured Data Markup: Implement Schema.org JSON-LD for organization, website, and navigation schemas
- Core Web Vitals: Optimize header scripts to prevent render-blocking and reduce Largest Contentful Paint
- Mobile-First Indexing: Ensure responsive header design with touch-friendly navigation elements
- Accessibility Standards: Follow WCAG 2.1 guidelines with proper ARIA labels and keyboard navigation
- Open Graph Tags: Include comprehensive social media metadata for optimal sharing previews
- Canonical Tags: Prevent duplicate content issues with proper canonical URL implementation
- Hreflang Attributes: Implement international targeting for multilingual websites
- Preload Critical Resources: Use resource hints (preload, prefetch, dns-prefetch) for performance
Performance Optimization Strategies:
<link rel=”preload” href=”/fonts/main-font.woff2″ as=”font” type=”font/woff2″ crossorigin>
<link rel=”preconnect” href=”https://fonts.googleapis.com”>
<link rel=”dns-prefetch” href=”https://www.google-analytics.com”><!– Async/Defer Non-Critical Scripts –>
<script async src=”analytics.js”></script>
<script defer src=”non-critical.js”></script>
Security Considerations for Header Modifications
Security remains paramount when modifying WordPress template files. Implement these security best practices to protect your site from vulnerabilities:
- Input Sanitization: Always escape output using WordPress functions like
esc_html(),esc_url(), andesc_attr() - Nonce Verification: Implement security tokens for form submissions and AJAX requests
- File Permissions: Set correct chmod permissions (644 for files, 755 for directories)
- Code Review: Audit third-party scripts before adding to header section
- HTTPS Enforcement: Ensure all header resources load via secure HTTPS protocol
- CSP Headers: Implement Content Security Policy for XSS protection
Advanced Header Customization with Theme Builders
Modern page builders like Elementor Pro, Beaver Themer, and GeneratePress Premium provide visual header builders that eliminate coding requirements:
Elementor Header Builder Workflow:
- Install Elementor Pro (premium version required for header templates)
- Navigate to Templates → Theme Builder
- Click Add New → Header
- Design header using drag-and-drop interface
- Set display conditions (entire site, specific pages, post types)
- Publish and preview across devices
- Divi Theme: Visual Builder with extensive header customization options
- Astra Pro: Lightweight theme with powerful header builder addon
- GeneratePress Premium: Elements module for custom header layouts
- OceanWP: Header customizer with multiple layout presets
- Kadence Theme: Header builder with advanced sticky scroll options
🎓 Ready to Master WordPress Development?
This comprehensive guide provides foundation knowledge for header and footer customization. Practice these techniques on staging environments before implementing on production sites. Always maintain backups and follow WordPress coding standards for professional development workflows.
Header Analytics & Conversion Tracking
Monitoring header performance provides insights into user behavior, navigation patterns, and conversion optimization opportunities:
Key Metrics to Track:
- Click-Through Rates: Monitor navigation menu click patterns using Google Analytics Events
- Search Bar Usage: Track internal site search queries and refinement behavior
- CTA Performance: Measure conversion rates on header call-to-action buttons
- Mobile Menu Interaction: Analyze hamburger menu engagement on mobile devices
- Load Time Impact: Monitor header script loading times in Page Speed Insights
<script>
document.querySelectorAll(‘.header-cta’).forEach(function(button) {
button.addEventListener(‘click’, function() {
gtag(‘event’, ‘header_cta_click’, {
‘event_category’: ‘engagement’,
‘event_label’: button.textContent
});
});
});
</script>
Accessibility-First Header Design Principles
Creating inclusive headers ensures all users can navigate your site effectively regardless of disabilities or assistive technology requirements:
- Semantic HTML: Use proper heading hierarchy (H1, nav, header elements)
- Keyboard Navigation: Ensure all interactive elements are keyboard accessible
- ARIA Landmarks: Implement appropriate ARIA labels for screen readers
- Color Contrast: Maintain WCAG AAA contrast ratios (7:1 for normal text)
- Skip Links: Provide skip-to-content links for keyboard users
- Focus Indicators: Maintain visible focus states for all interactive elements
Conclusion: Mastering WordPress Header Customization
WordPress header and footer modification represents fundamental skills for effective website management, theme development, and digital marketing implementation. This comprehensive tutorial covered three primary customization methods suitable for different skill levels and requirements.
📝 Key Takeaways:
- Choose plugin-based solutions for simple code injection without template modification
- Use direct PHP editing for structural changes requiring granular control
- Leverage FTP access for reliable file management and emergency situations
- Always implement customizations through child themes to preserve modifications
- Prioritize performance optimization, SEO best practices, and accessibility standards
- Test thoroughly across devices, browsers, and screen sizes before deployment
- Maintain regular backups and document all customizations for future reference
Whether you’re implementing tracking codes, customizing branding elements, optimizing navigation structures, or enhancing visual design, understanding header architecture enables effective website management. Apply these techniques thoughtfully, test rigorously, and maintain coding standards for sustainable WordPress development.
💡 FINAL PRO TIP: Join WordPress development communities (WordPress.org forums, Stack Overflow, Reddit’s r/WordPress) to stay updated on emerging best practices, security patches, and modern development techniques. Continuous learning ensures your skills remain relevant in the evolving web development landscape.
Additional Resources for Further Learning:
- WordPress Codex: Official documentation for template hierarchy and theme development
- WordPress Developer Handbook: Comprehensive guide to WordPress coding standards
- WPBeginner Blog: Beginner-friendly tutorials and plugin recommendations
- CSS-Tricks: Advanced CSS techniques for header styling and animations
- MDN Web Docs: HTML, CSS, and JavaScript reference documentation
Implement these header customization strategies to enhance user experience, improve search engine visibility, and create professionally designed WordPress websites that achieve business objectives. Remember that effective header design balances aesthetic appeal with functional utility, technical performance with user-friendly navigation, and brand identity with conversion optimization.
- Access WordPress Dashboard: Log into your WordPress admin panel at
yoursite.com/wp-admin - Navigate to Plugin Installation: Go to Plugins → Add New in the sidebar menu
- Search Plugin Repository: Enter “Insert Headers and Footers” in the search field
- Install Plugin: Click Install Now on the official plugin by WPBeginner
- Activate Functionality: Press Activate to enable the plugin features
- Configure Settings: Access Settings → Insert Headers and Footers
🎯 Plugin Configuration Interface:
The plugin interface provides three distinct code injection areas:
- Header Scripts: Code inserted before the
</head>closing tag (analytics, meta tags, CSS) - Body Scripts: Code injected after the
<body>opening tag (pixel tracking, heat maps) - Footer Scripts: Code placed before
</body>closing tag (JavaScript libraries, widgets)
<script async src=”https://www.googletagmanager.com/gtag/js?id=G-XXXXXXXXXX”></script>
<script>
window.dataLayer = window.dataLayer || [];
function gtag(){dataLayer.push(arguments);}
gtag(‘js’, new Date());
gtag(‘config’, ‘G-XXXXXXXXXX’);
</script>
💡 PRO TIP: After adding header code through the plugin, clear your WordPress caching plugin cache and browser cache to see changes immediately. Test across multiple devices to ensure responsive rendering.
Method 2: Direct PHP Template File Modification for Advanced Customization
Editing header.php Template File via WordPress Theme Editor
For developers requiring granular control over header structure, HTML markup, and WordPress template tags, direct template file editing provides maximum flexibility. This method enables structural modifications, custom loop implementations, and complex conditional logic beyond simple code injection.
⚠️ CRITICAL WARNING: Always create a child theme before modifying core template files. Direct parent theme modifications will be overwritten during theme updates, resulting in permanent loss of customizations.
Child Theme Creation Best Practices:
Child themes inherit parent theme functionality while maintaining customizations safely. Create a child theme manually or use plugins like Child Theme Configurator or WP Child Theme Generator for automated setup.
- Access Theme Editor: Navigate to Appearance → Theme Editor in WordPress dashboard
- Select Active Theme: Ensure your child theme is selected in the theme dropdown
- Locate header.php: Find the Theme Header file in the right sidebar template list
- Review Template Structure: Examine existing code before making modifications
- Add Custom Code: Insert customizations between
<head>and</head>tags - Update File: Click Update File to save template changes
- Verify Implementation: View page source code to confirm header modifications
Common Header Customization Use Cases:
<meta property=”og:title” content=”<?php wp_title(”); ?>” />
<meta property=”og:description” content=”<?php bloginfo(‘description’); ?>” />
<meta property=”og:image” content=”<?php echo get_header_image(); ?>” />
<meta name=”twitter:card” content=”summary_large_image” /><!– Implement Schema.org Structured Data –>
<script type=”application/ld+json”>
{
“@context”: “https://schema.org”,
“@type”: “Organization”,
“name”: “<?php bloginfo(‘name’); ?>”,
“url”: “<?php echo home_url(); ?>”,
“logo”: “<?php echo get_header_image(); ?>”
}
</script>
Tracking Code Implementation Guidelines:
Popular tracking and verification codes belong in the header section for optimal performance:
- Google Analytics 4: Universal site tracking and event measurement
- Google Tag Manager: Centralized tag management container
- Facebook Pixel: Conversion tracking and audience building
- Google Search Console: Site ownership verification meta tag
- Pinterest Verification: Business account verification code
- Bing Webmaster Tools: Search engine verification tag
Method 3: FTP File Transfer Protocol for Secure Template Access
Professional FTP-Based Header Modification Workflow
File Transfer Protocol access provides the most reliable method for template editing, especially when WordPress dashboard access is unavailable or when working with large file modifications. FTP clients offer advanced features like file comparison, batch operations, and local backup creation.
FTP Client Setup and Configuration:
Popular FTP clients include FileZilla (cross-platform), Cyberduck (Mac/Windows), WinSCP (Windows), and Transmit (Mac). Obtain FTP credentials from your hosting control panel (cPanel, Plesk, or custom dashboard).
- Obtain FTP Credentials: Access hosting cPanel and create/locate FTP account details
- Configure FTP Client: Enter hostname, username, password, and port (typically 21)
- Connect to Server: Establish secure connection using SFTP when available
- Navigate File Structure: Browse to
/wp-content/themes/your-theme-name/ - Download header.php: Right-click file and select download/edit option
- Modify Locally: Edit file using code editor (VS Code, Sublime Text, Notepad++)
- Upload Modified File: Save changes and upload back to server, overwriting original
- Verify Changes: Clear cache and check site frontend for modifications
💡 PRO TIP: Before uploading modified files, create a backup copy of the original header.php file. Rename it to header-backup.php and store it in the same directory for emergency restoration.
FTP Advantages for Professional Development:
- Offline Editing: Modify files locally using professional code editors
- Version Control: Maintain file version history and change tracking
- Bulk Operations: Upload/download multiple template files simultaneously
- Emergency Access: Recover sites when WordPress dashboard is inaccessible
- File Permissions: Set correct chmod permissions for security optimization
Advanced Header Customization: Typography, CSS Styling & Responsive Design
Beyond code injection and template modification, visual customization transforms header appearance, branding consistency, and user interface design. Modern WordPress themes provide built-in customization options through the WordPress Customizer interface.
WordPress Customizer CSS Injection Method:
- Navigate to Appearance → Customize in WordPress dashboard
- Locate Additional CSS section in Customizer sidebar
- Inspect header elements using browser DevTools (F12) to identify CSS classes
- Write custom CSS rules targeting specific header components
- Preview changes in real-time before publishing modifications
.site-header .main-title {
font-family: ‘Montserrat’, sans-serif;
font-size: 32px;
font-weight: 700;
color: #2c3e50;
letter-spacing: -0.5px;
text-transform: uppercase;
}/* Responsive Header Navigation */
@media (max-width: 768px) {
.site-header .main-navigation {
display: flex;
flex-direction: column;
align-items: center;
}
}/* Header Background Gradient Effect */
.site-header {
background: linear-gradient(135deg, #667eea 0%, #764ba2 100%);
padding: 20px 0;
box-shadow: 0 2px 15px rgba(0,0,0,0.1);
}
Custom Logo Implementation Tutorial:
WordPress includes native custom logo support through the Customizer interface. However, theme developers can implement custom logo functionality programmatically for enhanced control:
function theme_custom_logo_setup() {
add_theme_support(‘custom-logo’, array(
‘height’ => 100,
‘width’ => 400,
‘flex-height’ => true,
‘flex-width’ => true,
‘header-text’ => array(‘site-title’, ‘site-description’),
));
}
add_action(‘after_setup_theme’, ‘theme_custom_logo_setup’);// Display custom logo in header.php
if (function_exists(‘the_custom_logo’)) {
the_custom_logo();
}
Footer sections typically contain copyright information, legal disclaimers, privacy policies, social media links, sitemap navigation, and widget areas. The footer.php template file controls footer output using the same editing methods as header customization.
Many themes display “Powered by WordPress” or theme credits in the footer. Remove or replace this text by editing the footer.php file:
- Access Appearance → Theme Editor → footer.php
- Locate the copyright or credits section (usually near bottom of file)
- Replace existing HTML with custom copyright notice
- Include dynamic year using PHP:
<?php echo date('Y'); ?> - Save changes and verify on site frontend
<footer class=”site-footer”>
<div class=”footer-copyright”>
<p>
© <?php echo date(‘Y’); ?> <?php bloginfo(‘name’); ?>.
All Rights Reserved. |
<a href=”<?php echo get_privacy_policy_url(); ?>”>Privacy Policy</a> |
<a href=”/terms-of-service/”>Terms of Service</a>
</p>
</div>
</footer>
Adding Visual Content: Images, Videos & Background Media
Custom Header Image Implementation:
WordPress themes supporting custom headers allow image uploads through the Customizer interface:
- Navigate to Appearance → Header or Appearance → Customize → Header Media
- Click Add New Image in Header Image section
- Upload image file or select from Media Library
- Crop image to recommended dimensions (varies by theme)
- Publish changes to activate new header image
💡 IMAGE OPTIMIZATION TIP: Compress header images using tools like TinyPNG or ShortPixel before uploading. Aim for file sizes under 200KB while maintaining visual quality. Use WebP format for superior compression and modern browser support.
Header Video Background Implementation:
Modern WordPress themes support video backgrounds in header sections, creating dynamic, engaging visual experiences. Two implementation methods exist:
Method A: YouTube Video Embedding
- Copy YouTube video URL from address bar
- Go to Appearance → Header
- Paste URL in Header Video field under Header Media section
- Click Publish to activate video background
Method B: Self-Hosted MP4 Video Upload
- Prepare MP4 video file (maximum 8MB file size limitation)
- Navigate to Appearance → Header
- Click Select Video under Header Video section
- Upload video file to WordPress Media Library
- Select uploaded video and publish changes
⚠️ PERFORMANCE WARNING: Video backgrounds significantly impact page load times and mobile data consumption. Implement lazy loading, provide fallback images, and consider disabling video on mobile devices for optimal performance.
Troubleshooting Common Header Editing Issues
Changes Not Appearing on Frontend:
- Clear WordPress Cache: Purge cache in caching plugins (WP Rocket, W3 Total Cache, WP Super Cache)
- Clear CDN Cache: Purge Cloudflare, StackPath, or other CDN caching layers
- Clear Browser Cache: Hard refresh using Ctrl+Shift+R (Windows) or Cmd+Shift+R (Mac)
- Verify File Upload: Confirm modified files uploaded successfully via FTP timestamp
- Check Syntax Errors: Review PHP error logs for parsing errors in template files
Missing header.php in Child Theme:
Child themes inherit parent theme templates automatically. If customization requires modifying header.php:


