How to add Expires Headers in WordPress – Ultimate Guide
Have you ever come across a recommendation that reads, “add expires headers”? If you have, then you aren’t alone. It’s one of the most common website performance-related recommendations that you’ll get when you start optimizing your site.
In this article, we will be going through a detailed tutorial on how to add expires headers to your WordPress website.
So, let’s get started.
How to: Add Expires Headers in WordPress using .htaccess?
Well, the expires headers tell the browsers how often they should request a cached file from the server and till they should grab the old cached file from the browser’s cache. The expires headers aren’t only the reduction in the downloads of the files but also helps browsers to reduce the least server requests to which a website can absorb because downloading the same file, again and again, gonna be wastage of precious load time.
So, the browser is responsible for communicating the webserver and download the required files in order to display the content on a webpage. For a first time visit, the browser would have to download all the files, so you got correct that expires headers don’t improve page speed but it is a way of reducing the server requests. Though, for the second time visit, the expires headers help you to decrease the page load time.
You add the expires headers manually as well as by using a caching plugin too. Here is what I want to show you that W3 Total Cache is the one that enables you to add expires headers automatically on one-click action.
Adding Expires Headers in WordPress
At first, you have to decide what files you update often, and also some files don’t get updated often. Here is a common list of file types that we realize so:
- images: jpg, gif, png
- favicon/ico
- javascript
- CSS
What are Expires Headers?
Expires headers tell the browsers what resource can be stored and fetched from the browser’s cache or the source itself. In effect, it’ll help your site load faster by being able to display certain elements from the cache and not having to get it from the server.
To make it work, the expires headers need to be set by the website owner. By doing so, the browser stores the resources locally for a given period of time set through expires headers.
For example, if you set expires headers on JPEG files, the browser will store all the JPEG files in its cache. This means a visitor can load the site faster as the browser has cached some resources related to the site.
By using expires headers, you will improve your site’s speed by reducing HTTP requests (the method used to communicate between the browser and a server) between your computer and the server.
Learning About Browser Caching
Browser caching enables the browser to cache to locally store resources improving site speed.
So, how does it work?
The browser sends a request to a server when you load a website. The server, in return, sends the necessary resources.
In the pursuit to load sites faster, browsers can use expires headers to identify which resources can be loaded locally from the browser cache.
Not sure, what we mean? Let’s see browser-caching in action.
GTMetrix is a website speed and performance optimization site. It shows you a detailed report of how your site loads.
As you can see, WPAstra’s main site utilizes browser caching. All of these are possible because of expires headers.
Browsing caching with the help of expires headers can lower website load time by reducing HTTP requests between your computer and the server.
How Expiration Headers Work With Browser Caching
The browser cache stores resources based on the rules in the expiration headers (another name for expires headers). These rules enforce how the resources are used when a browser loads a site.
So, basically, if a resource’s age isn’t expired, it’s loaded from the browser cache. If not, then your computer requests it from the server again.
But, what happens when a site is requested by a computer for the first time?
In that case, all the site’s resources are directly downloaded from the server.
From the second time onwards, the browser will check its cache for non-expired resources and utilize it to save bandwidth and time.
If you want to learn more about it technically, we have covered it below. However, if you aren’t interested, you can jump to the next section!
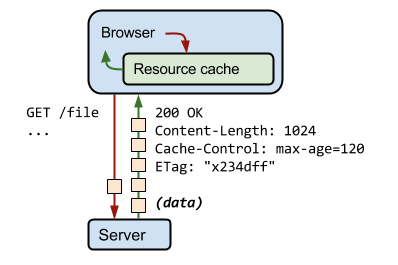
As you can see from the image, the browser first checks with the resource cache (browser cache).
The information is then sent from the server to the browser via HTTP headers. All you need to know about HTTP headers is that they are used to send additional information between your computer and the server.
Another important concept that makes all of these happen is Cache-Control.
With Cache-Control, you can define browser-caching policies that work on both server and client-side.
If you check the images above, you will see that the expiration time set in the HTTP header is done using Cache-Control.
In short, Cache-Control offers a better way to implement browser cache as it overcomes the browser-based cache.
For instance, it looks after the following.
- Resources that need to be cached
- Where to store the cache
- Maximum age after which the cache expires
Let’s see cache-control in action on wpastra.com.
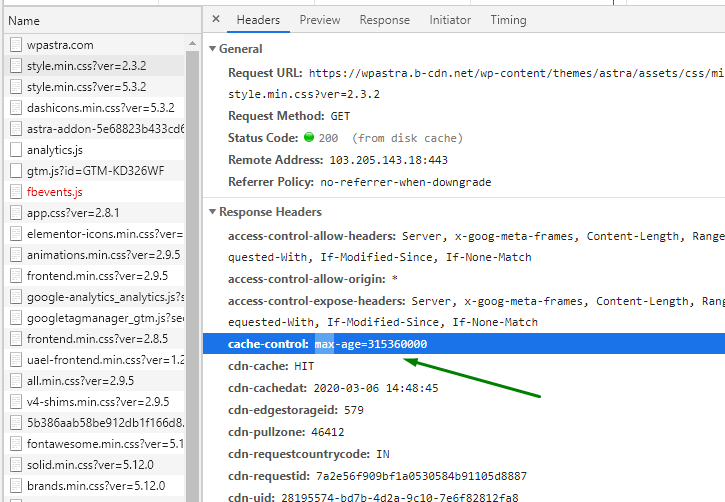
If you’re curious to learn more, we recommend checking out the Cache-Control – HTTP guide on Mozilla MDN or read Google’s guide on it.
If you also want to learn more about caching and how it’s related to WordPress, check out our ultimate guide to WordPress caching post.
Why Expiration Headers are Important
Expiration headers are important for the following reasons
- It helps your site to load faster (after the first initial request)
- It helps your server to manage more requests at any given time.
Which Resources You Should Cache Using Expires Headers?
Expires headers are useful if you know which resources you need to cache. For any general blogging site, implementing expires headers is easy as the rules can be applied to a wide range of resources, including images, videos, and so on.
But, the challenge comes when you need to implement a complex site such as eCommerce.
In both cases, the goal is to reduce HTTP requests and not increase them.
So, which resources, do you need to cache? Let’s go through a couple of scenarios to get a better understanding.
Scenario 1: Setting resource expiration age too long
If you set the resource expiration age for a long time, then the resource will be served to the user without any change for that given time.
In this case, if you decide to make changes to the site within that given period, the user will still see older versions of the site until the resource expires.
This can be solved by defining expiration time based on the resource type. In general, try to avoid adding default time span to all the resources.
For instance, you shouldn’t cache an entire section of scripts, HTML, images or other forms of the resources.
Even if you decide to do so, you need to make sure you know the impact of the changes on your site.
Asking yourself questions such as, “Will all the pages on my site function properly if I cache X or Y resource?”, can help you to implement expires headers correctly.
Generally, it’s a good idea to add expires headers to static resources as they are changed the least.
Scenario 2: Running a functionally complex site such as an eCommerce site
If you’re running an eCommerce site, you should be wary of the issues that come with expiration headers.
Let’s go through an example below.
A user visits your eCommerce site and adds new items to the shopping cart. However, if the resources on your site are cached incorrectly, then previously added products by the user(from a previous session) will show up in the shopping cart instead of freshly added products.
The buyer can solve the problem by pressing CTRL + F5 (forces a cache refresh), but that would be too much to ask from the buyer. Also, it creates a bad user experience and will surely impact user retention and sales figures.
So, where does this leave us? As an eCommerce owner, you can decide to add expires headers to resources based on their impact on user experience. Your goal is to provide a seamless user experience without breaking the site.
If all of these seems a little too complicated and overwhelming, don’t worry, all you need to know is that expires headers tells your browser what to get from the cache, and what not to.
Your job is deciding what to and not to set. And we’ve got you covered on that, just read on.
Does Expires Headers Solve Slow Website Loading Time?
Not all sites are created equally and that changes how expires headers work.
For example, if you cache an eCommerce site improperly, you’re bound to get errors that directly affect the functionality of the site. It will also slow down the site.
For other generic sites, expires headers will improve website loading time by reducing HTTP requests.
In some cases, expires headers can slow down the site if not implemented correctly.
How to Add Expires Headers to Your WordPress Website
Excellent, if you made it this far, you deserve a cookie!
WordPress is a versatile content management system. This means it’s flexible and offers multiple ways to cope with a problem.
That’s why, in this section, we’re going to show you how to add expires headers manually to servers such as Apache Server, Nginx, and CDN Systems.
We will also show you how to add expires headers using plugins. (Yup, we know, this is mainly what you came to read.)
Adding Expires Headers Manually
Apache Server
One of the easiest ways to add expires headers to a WordPress site running on Apache server is to do it through the .htaccess file.
You can access it through two methods.
- cPanel
- FTP Client such as FileZilla
For the sake of simplicity, we’re going to use the first method. The method also applies to FTP clients if you know how to connect to your web server using it.
First, you need to login to your cPanel. If you’re using any popular hosting platform such as Bluehost or InMotionHosting, you should have an option as shown below.

Click on it, and you should be able to access the cPanel.
There, you will find the File Manager option.

From there, click on the File Manager and then proceed to click on the “public_html” folder.

Once you’re inside the folder, you need to search for .htaccess file. If you aren’t able to find it, then make sure that the hidden files are set to “show.”

Now, open the file by right-clicking it and “edit.”

Now, you need to add the following code to the file and save it.
<IfModule mod_expires.c>
ExpiresActive On # Images ExpiresByType image/jpeg “access plus 1 year”
ExpiresByType image/gif “access plus 1 year”
ExpiresByType image/png “access plus 1 year”
ExpiresByType image/webp “access plus 1 year”
ExpiresByType image/svg+xml “access plus 1 year”
ExpiresByType image/x-icon “access plus 1 year”
# Video ExpiresByType video/mp4 “access plus 1 year”
ExpiresByType video/mpeg “access plus 1 year” # CSS,
JavaScript ExpiresByType text/css “access plus 1 month”
ExpiresByType text/javascript “access plus 1 month”
ExpiresByType application/javascript “access plus 1 month”
# Others ExpiresByType application/pdf “access plus 1 month”
ExpiresByType application/x-shockwave-flash “access plus 1 month”
</IfModule>
As you can see, we have added expires headers for different types of resources, including images, video, CSS, JavaSCript, and others.
Does the code look complex? Don’t worry as all you need to do is copy-paste the code in the .htaccess file.
But, if you’re confident and know what the code does, then you can alter the code according to your requirements.
For an eCommerce site, you simply cannot put all the static files in one single folder and then apply the same expires headers rules.
The best approach is to create multiple folders and use .htaccess files in each of those folders to gain finer control.
Another way, you can improve browser-caching is to add Cache-Control.
To add Cache-Control, you need to add the following code in .htaccess file.
# BEGIN Cache-Control Headers
<IfModule mod_expires.c>
<IfModule mod_headers.c>
<filesMatch “\.(ico|jpe?g|png|gif|swf)$”>
Header append Cache-Control “public”
</filesMatch>
<filesMatch “\.(css)$”>
Header append Cache-Control “public”
</filesMatch>
<filesMatch “\.(js)$”>
Header append Cache-Control “private”
</filesMatch>
<filesMatch “\.(x?html?|php)$”>
Header append Cache-Control “private, must-revalidate”
</filesMatch>
</IfModule>
</IfModule>
NGINX
NGINX works differently than the Apache server. That’s why you won’t be able to find the .htaccess file.
The reason behind it’s due to the core NGINX philosophy for performance. By eliminating the need for the .htaccess file, the server can access information faster.
If you want to read more about it, then check out this article here: Like Apache: .htaccess.
So, how do you add expires headers to NGINX?
To do so, you need to edit the main server block. Once you made the necessary edits, you need to reload NGINX for them to take effect.
Just copy the code as shown below and add it to the server block. This will set the expires headers in NGINX.
location ~* \.(jpg|jpeg|gif|png)$ { expires 365d; } location ~* \.(pdf|css|html|js|swf)$ { expires 2d; }
Alternatively, you can also use the Cache-Control header. To do so, add the following line to the server block.
https://www.nginx.com/resources/wiki/start/topics/examples/likeapache-htaccess/
Restart the server for the Cache-Control header to take effect.
FAQs About Adding Expires Headers
1. What should be the expiration time?
You can set the expiration time for any resources in years, months, weeks, and so on. However, this doesn’t mean that you should set an unrealistic expiration date.
The best approach is to make an educated guess on how long the resource needs time before it’s refreshed. Most of the time, static files are good candidates for a long expiration time. However, it’s better to add low expiration time for files such as HTML, CSS, and JavaScript.
2. How can I test if my changes worked after adding expires headers?
The best way to test if your expires headers are working or not is to use tools such as GTMetrix, Google PageSpeed, and Pingdom.
Expires headers let browsers know if they should fetch a resource on a website from the browser’s cache or if it needs to be requested from the source e.g database. For example, is expires headers are set for images when a user loads a website, the browser will store the images in the cache. The next time the visitor comes back, the page will load much faster, as the images required are not requested from the database but are instead loaded from the browser’s cache.
Expires headers can be added to specific files or even file types. When a visitor revisits a website, the browser will check when was the last time the resource was downloaded. If it was recently, then it will display those from the cache. Otherwise, it will download a newer version from the server. It is, therefore, best practice to set long expiry times for items that don’t change on your website for example logo, colors, header pics, footer icons, etc. You can also set short expiry times for items that change frequently.
This ultimately influences the website’s speed. It improves the user experience, increases average time spent, and helps lower the bounce rate. Search engines use page speed as a major ranking factor when ranking websites in search engines. Adding expires headers can also help reduce bandwidth costs by reducing the number of times an image has to be requested from the database.
How Cache and Expires Header Affect Page Loading Speed
A response to a user request from the cache takes less time than a response from the server. These processes look like this: 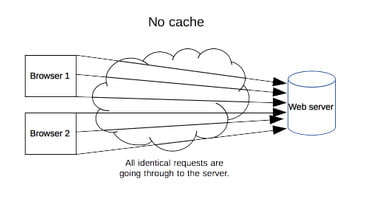
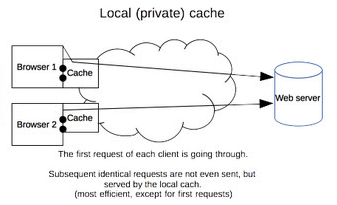 Developer Mozilla As you can see, the path to cache information is simpler and shorter. The way the cache affects the speed of the site can be seen in the following examples. The news site doesn’t use a cache, ao its page opening speed is slow:
 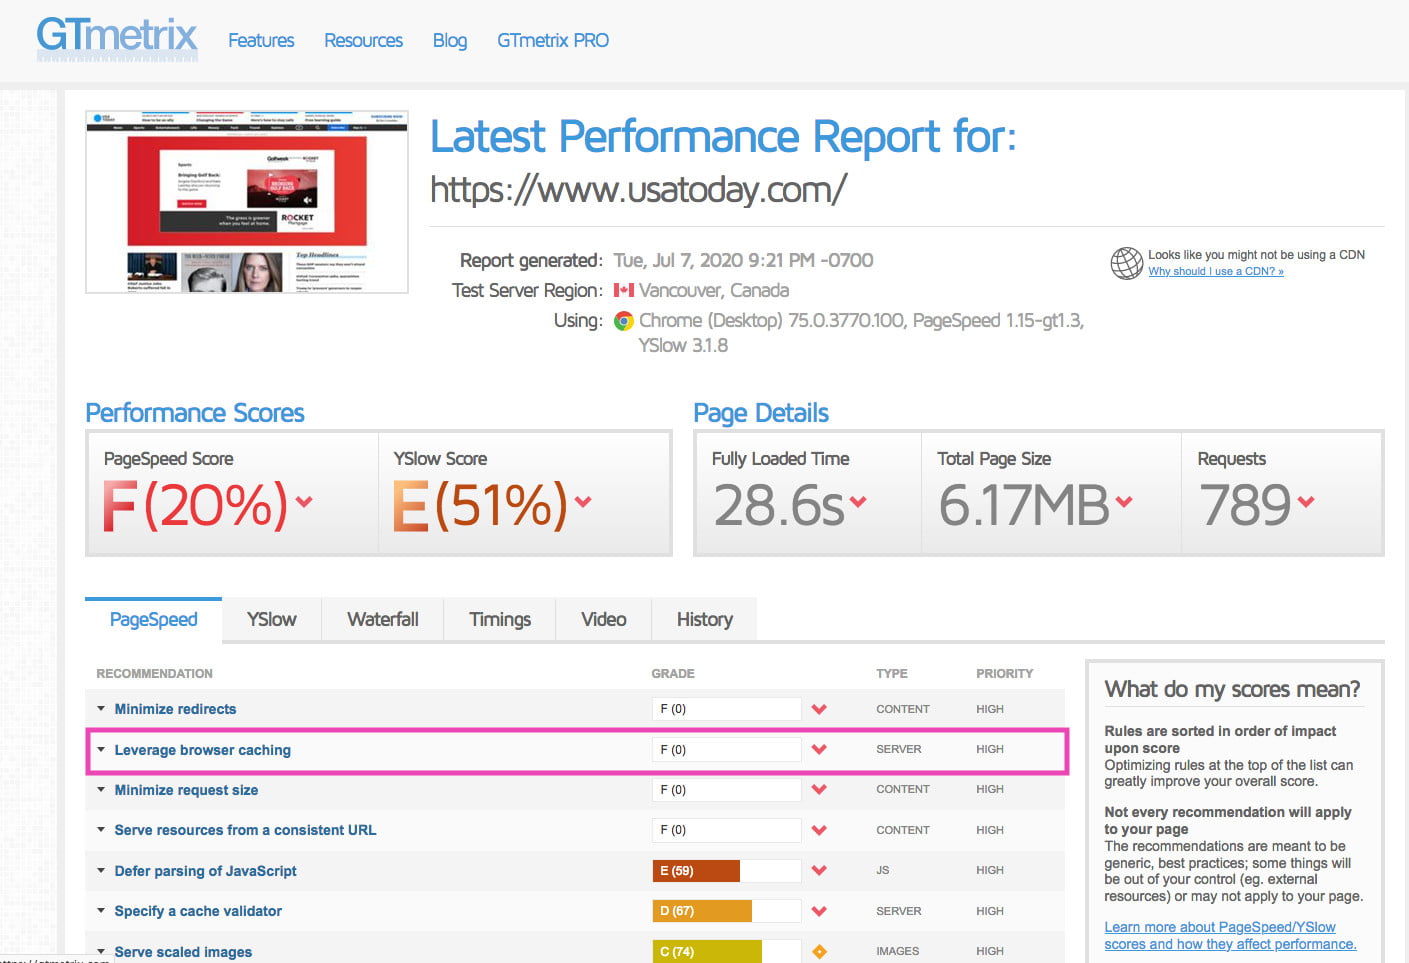 GTmetrix Amazon uses caching partially. Its average speed is as follows:
 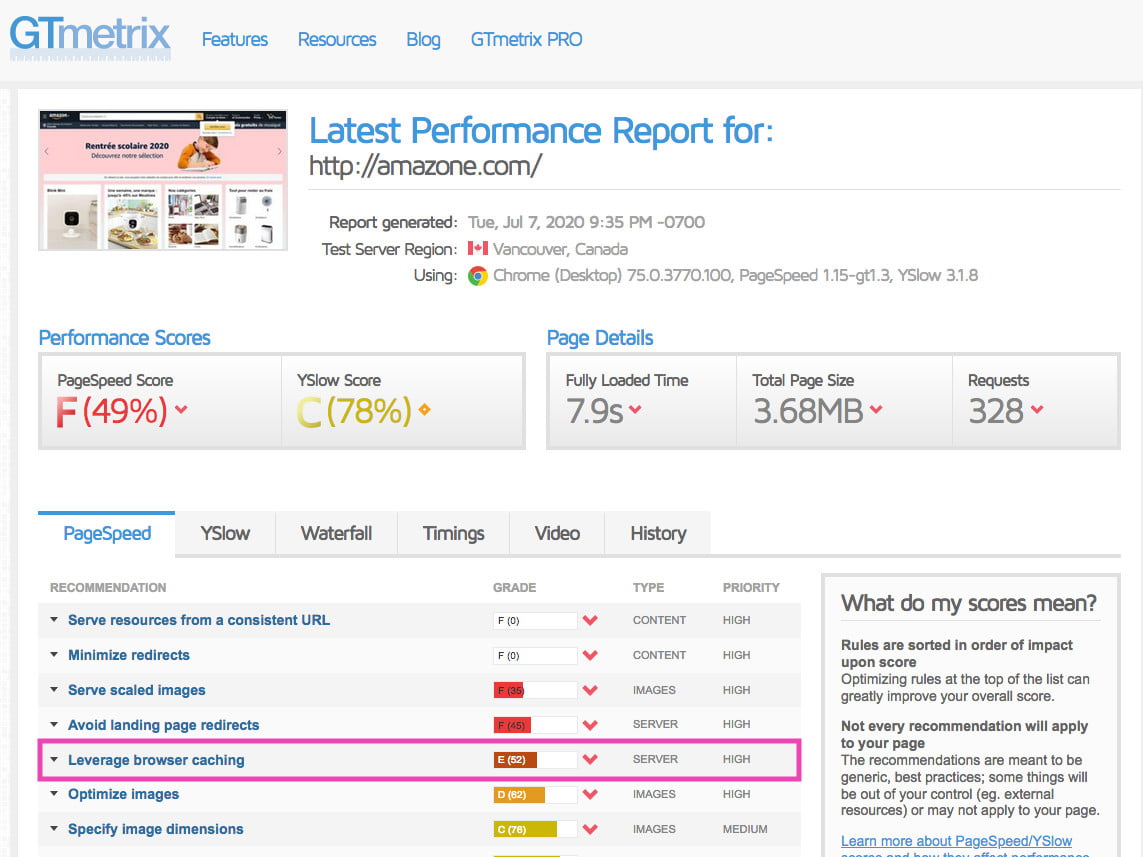 GTmetrix On this site you can see a high level of caching usage, as well as high speed:
 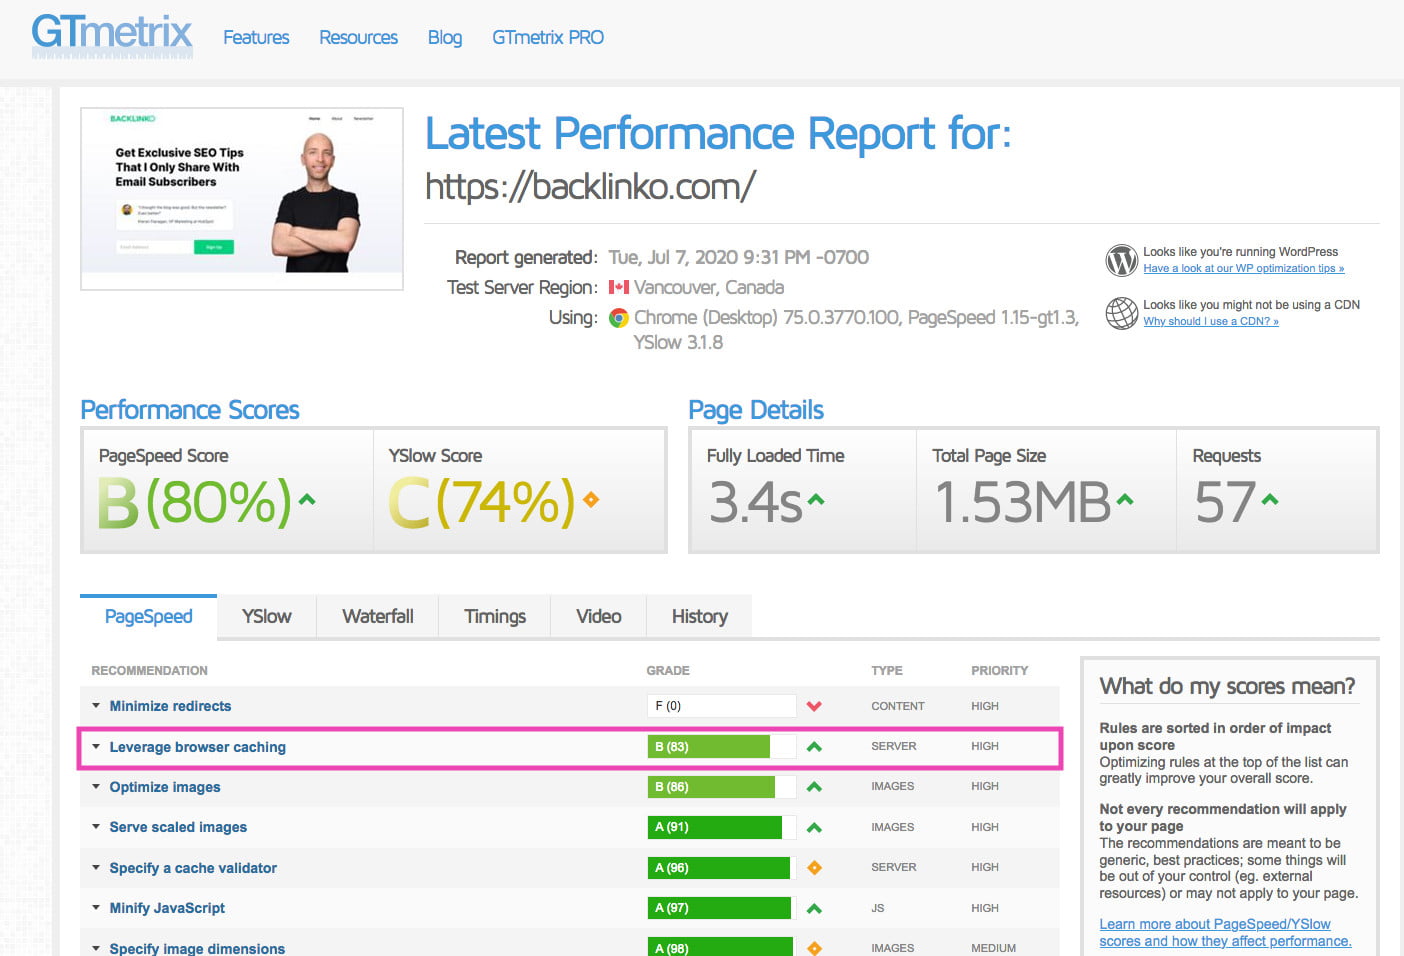 GTmetrix Of course, many factors affect the speed of pages opening, including:
- Volume and weight of content, size, and the number of photos used
- Technical features of the site, features of the CMS platform
- The degree of complexity of design and layout
- The speed and quality of the server
- Using Accelerated Mobile Pages technology and others. Read more in the What You Need to Know About Accelerated Mobile Pages article
At the same time, the use of caching can affect the download speed of individual pages, so it is sometimes advisable to use this technology. Let’s consider when it is worth it to add expires headers and for which pages will be a good way to speed up and stay in the users’ field of vision.
To add expire headers, place the following code towards the top of your.htaccess file:
EXPIRES HEADER CACHING ##
<IfModule mod_expires.c>
ExpiresActive On
ExpiresByType image/jpg “access 1 year”
ExpiresByType image/jpeg “access 1 year”
ExpiresByType image/gif “access 1 year”
ExpiresByType image/png “access 1 year”
ExpiresByType image/svg “access 1 year”
ExpiresByType text/css “access 1 month”
ExpiresByType application/pdf “access 1 month”
ExpiresByType application/javascript “access 1 month”
ExpiresByType application/x-javascript “access 1 month”
ExpiresByType application/x-shockwave-flash “access 1 month”
ExpiresByType image/x-icon “access 1 year”
ExpiresDefault “access 3 days”
</IfModule>
## EXPIRES HEADER CACHING ##
When, How, and for What Types of Pages Should You Use Expires Header?
Expires headers are appropriate for pages and content elements that are updated on a regular basis or will be modified in the near future. The advantages of headers arise from the fact that they allow content to be stored in the browser’s cache. It’s also useful because it makes its updates obvious to the user and, over time, eliminates obsolete items from the cache. Image expires tags are particularly useful since they allow you to set the storage time for photos in the cache.
This may become obsolete and lose their relevance over time. Before you add the expires header to the HTML structure, you should carefully analyze the content and understand what will change and what will remain unchanged. Read more in the article Website Content Audit. For example, long stored can be:
- Home page with carefully thought-out design, text, style, and so on
- Key structural content
- Sections with product categories on e-commerce site, more information in the Ecommerce SEO article
- Archive pages of information portals, creative blogs with articles, photos, etc.
When thinking about where and how to use the expires header, it is important to consider all the components of the content and foresee how long you plan to leave it unchanged. With extreme caution, you should approach the ExpiresDefault header, which applies the specified period to all content by default. If certain elements change at different times, it is better to register time intervals separately using the ExpiresByType syntax.
It can be used to configure dynamic and updated elements so that they change at their own pace. When working with e-commerce websites, pay special attention to expire headers. It will be beneficial to check expire headers on a frequent basis to ensure that the information saved in the cache corresponds to the current information on the site. In the case of electronic stores, users frequently return to product pages that have been saved in the browser cache.
If the product is often changed, or if the product is projected to be out of stock within a month or so, it is worth stating in the expire headers of the corresponding pages to avoid customer service issues. The event page is another place where expire headers can be useful. For example, if you establish a website for a film festival, the content on it will be useful for a particular period of time. So, for a page with tickets, a programme, participants, and so on, you may use expires headers, setting the interval until it is relevant. The pages of the site that remain in the user’s cache will be updated by tying the content’s end date with the festival’s finish date. being filled with fresh content.
How to Add Expires Headers?
In order to add expires headers in WordPress, you can use plugins, particularly ones developed by the same CMS – Add Expires Header. 
Expires Headers should be added. It allows you to simply select files of various sorts for which expires headers will be set at a specified interval. At the same time, because the interval in the plugin is expressed in days, it’s critical to double-check the deadline to avoid leaving the header in place for an extended period of time: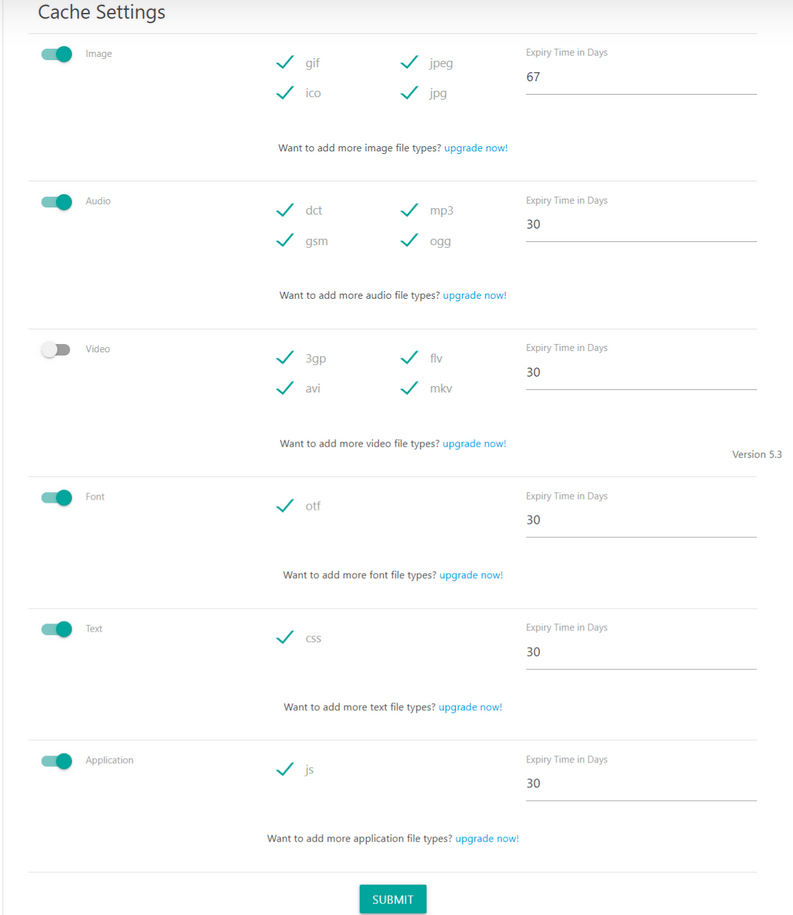
Expires Headers should be added. You can use the service to set headers from the Apache server to add expires headers in WordPress without using a plugin. .htaccess files will be utilised to do this. The cPanel or FTP tools can be used to gain access, and the free FileZilla service can be used to deal with them. In general, utilising the plugin can save time, but manually configuring the expires headers can result in more variations. When working manually, however, you must double-check the accuracy of the stated action time, which is particularly crucial for e-commerce sites.
SPEED TEST TOOLS
Often when running speed tests with tools such as GTMetrix you will get a recommendation to add expired headers. An example is shown below:
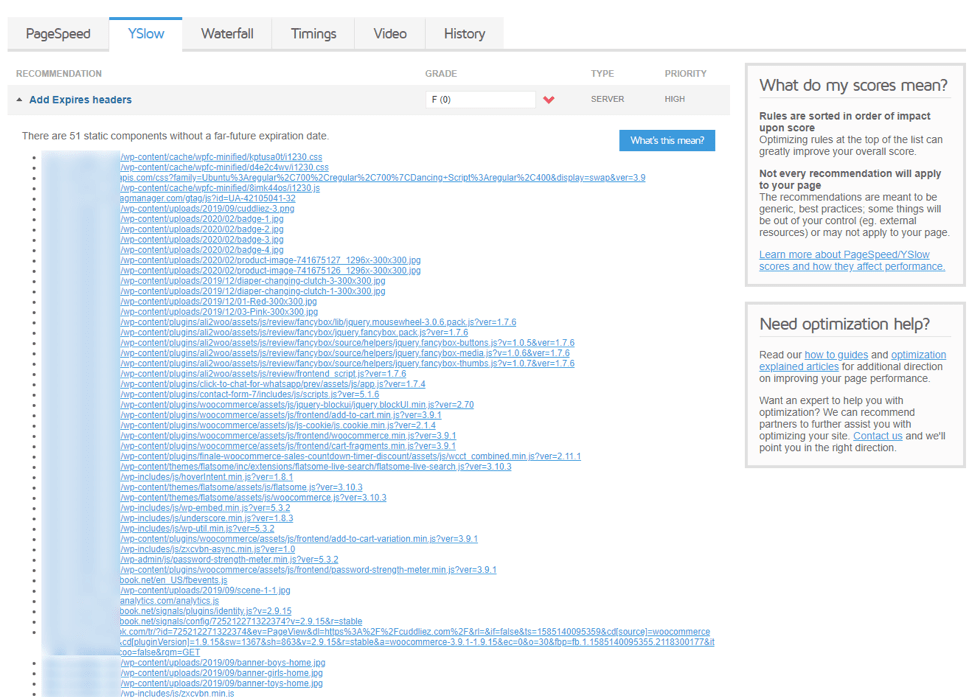
Other tools such as Google PageSpeed, Pingdom, and many other speed test tools recommend implementing expires headers.
You may be wondering how long should you set expires headers for? Well, there are no hard and fast rules for that. You need to analyze your situation. As a general rule for files that are modified frequently, set shorter expiry time. For files such as your logo, you can set an expiry time of 1 year.
Adding Expires Headers in WordPress
There are several methods of adding expires headers in WordPress. You can use a plugin or manually add code to your .htaccess file.
Adding Expires Headers Using a Plugin
Install and activate the Add Expires Header Plugin.
https://wordpress.org/plugins/add-expires-headers/
Check Files types you want to have expired headers and add respective expires days for mime type using input box and make sure you enable respective mime type, for which group of files you want to add expires headers.
Conclusion
It’s clear that expires headers improve website loading speed. Even though it’s not going to make considerable changes to your site’s speed — the technique is bound to enhance the user’s experience.
With that said, it’s essential to know how to implement expires headers correctly. If you do it wrong, it will slow your site down. This is especially true for more dynamic and functional sites such as eCommerce sites.
Moreover, most of the sites will do fine with the code-snippet that we shared in the article for expires headers.
If you’re still not sure what to do, then we suggest you use the comment section below and let us know! We’re here to help!
