How To Create A WordPress Blog From Scratch – In 9 Easy Steps For Beginners And Amateur Bloggers
Have you ever thought of starting your personal blog but didn’t have the slightest idea about where to begin?
Definitely, WordPress, which is a free and open-source software (CMS), is the quickest and the most simple way of creating a website. WordPress has been around for more than 10 years and is the leading blogging platform on the internet. Almost 60% of all websites are powered by WordPress. It is user-friendly, and you do not need to have coding or any kind of experience.
In 2017, we launched our WordPress blog, getsocialguide, and have been regularly posting since then. We had zero views when we started, but after a year, we were getting 400 or more views every month. It takes quite a while to build a successful blog. On average, it takes about 2.5 years. This time frame is quite long, and you should only consider it if you publish at least once a week.
Moreover, the truth is that setting up a free blog is quite surprisingly simple. So, we claim that it can be accomplished in less than 10 minutes by following 9 simple steps for beginner bloggers.
9 Simple Easy Steps To Create A WordPress Blog From Scratch
Though this tutorial is written for people who have never done anything like this before. Even if you don’t want to learn web design at all, you can still follow this tutorial.
But since I teach people how to design websites, I’ll talk about why making your own WordPress blog is a great way to learn how to design websites. I used my blog as a place to practise HTML and CSS so I could learn how to make websites. I learned how to write a book by writing on my blog.
What do you need to do to start your blog?
To make a blog that works well, you will need the following:
- Web hosting (FastComet charges $40 to $90 per year)
- A domain name, which costs $10 per year with FastComet,
- A blogging platform (Free using WordPress)
- A theme for WordPress (Free using Kadence Theme)
- Plugins for WordPress (Free)
How do you start a blog? What skills do you need?
If you know how to use a computer well enough, you should be able to set up a blog with no trouble. You don’t need to know how to code or make a website. This tutorial will walk you through starting a WordPress blog from scratch, step by step (no steps skipped). Even if you have never made a blog before, you will have one that looks good and works well.
If you learn better by seeing, I’ve also put links to videos that you can watch.
In this guide on How To Create A WordPress Blog From Scratch, we’ll talk about the following 9 easy-to-follow steps:
Part -1
Step 1: How to Pick Your Niche
Step 2: How to get a free domain name that you choose
Step 3: How to Pick the Best Website Host
Part -2
Step 4: How to Install WordPress and Set It Up
Step 5: How to Install Custom WordPress Theme
Step 6: How to Write the First Post on your Blog
Part -3
Step 7: How to Use Plugins to Change a WordPress Blog
Step 8: How to make your website work better for SEO
Step 9: How to Make Money With Your Blog
Ready? Let’s get started.
How much time will it take to create a blog?
Less than 30 minutes should be required to complete the actual step of setting up your blog from scratch, but the entire process—including writing your first blog post—should take you around 5 to 6 hours. The amount of time you will need to spend on each step is broken out below.
- Part 1: You can learn more about the niche selection and the platform and services we’ll be using by reading the first four stages (Steps 1 to 4). You can read through the steps in about 10 minutes. You can move directly to Step 5 if you are already familiar with the ideas.
- Part 2: Online publication of your blog (Step 5). Your domain name and web hosting account will need to be registered and paid for. It shouldn’t take more than 30 minutes to complete this.
- Part 3: The blog’s setup is covered in the following four steps (Steps 6-9). You should spend two to four hours on this step.
However, you should move at your own pace and feel free to take a break if you feel the need to prevent feeling overextended.
Part – 1 (Steps 1 – 3) – How To Create A WordPress Blog From Scratch
STEP – 1: How to Pick Your Niche
The first question here can be, what is a niche really? A niche is a focused theme or a domain, you choose to work on while creating content. So, by doing this you can very quickly reach out to the people having the same interests as you and build up a loyal following gradually.
Before picking your niche, you should consider these two points:
- Choose a niche which is related to your interests or passions. Eventually, this will be better for you.
- First of all, with more assurance, you can and should choose topics that you somewhat know, have some experience with, and can write about quite easily.
These different niches that concentrate on parenting, beauty, food, health, or finance, for example, are some of the many existing. Every niche has challengers, thus, to be able to stand out you have to deliver your unique perspective on the topic. Take travel, for instance, which is one of the most popular and diverse niches with large & stable audiences. If you want to be different, you can concentrate on a particular side of the issue like solo travel, backpacking, camping, hiking, or cycling. Then, you can begin producing the content that shows your opinions and real-life experiences to give the niche a new and fresh angle.
STEP – 2: How to get a free domain name that you choose for your niche
Select a Platform for Your Blog
In this lesson, WordPress will be used. More than 40% of all websites on the internet are powered by WordPress, the most widely used blogging platform. It provides a number of excellent benefits.
- It is free to use. You won’t encounter limitations like those in other paid or free blogging platforms.
- It’s free. This helps you establish a website for less money.
- It is simple to use and intuitive. WordPress won’t be a problem for you if you can utilise a word processor like MS Word.
- You can choose one of the countless free themes and plugins to transform your blog whatever you like.
- It is excellent for SEO and attracting Google visitors.
- Installing it is simple. The web hosting firm we’ll be using (FastComet) makes installing WordPress simple and only requires one click (see Step 6).
Choosing a Domain Name
Your blog’s internet address is its domain name. It is what users type into their browsers to access your blog. In this case, getsocialguide.com
Although registering a domain name is inexpensive, it will give your blog a polished, SEO-friendly appearance. Additionally, you may establish your brand and domain authority immediately.
Quick suggestions for picking a quality domain name
Utilizing a few general advices will be helpful for you in choosing your domain name:
Try to be distinct. The domain name is the face of your brand, and therefore it has to be distinctive.
Try to use the .com domain name extension as much as you can. Since more people are used to websites that end in.com, a .com domain name is pretty easy to remember.
Be descriptive. Get a domain name that describes your industry or market. For example, if you have a carpet business, for instance, tribalcarpets.com.
Select a name that will not restrict your blog to later be able to expand. If you decide on woolcarpets.com, for instance, this may limit your options to wool carpets and create a problem with you if you decide to grow in other types of carpets.
Ensure that your domain name is both short and memorable. It should be easy to say and spell. Do not use numbers or other special characters (such as hyphens, dollar signs, or underscores). Avoid names that have been registered as trademarks. You may be sued in this case.
STEP – 3: How to Pick the Best Website Host Hostinger (recommended)
The next step after buying a domain name is to host your website online. To save money, choose a longer-term plan (ideally an annual plan) if you want to be consistent. You might want to upgrade or switch later as the website develops. Choose your server space wisely if your website has a lot of images or videos. The best option to start with is shared hosting or WordPress hosting.
We presently employ Hostinger and endorse it. They offer competent client service. The majority of service providers provide welcome discounts but keep in mind that when you renew the plan, the cost doubles. so, it’s better to subscribe to longer plain 2 or 3 years, Personally, I go with the 5-year plan at Hostinger.
Hostinger’s Shared Hosting is known for its feature-rich cheap web hosting prices:
| Single Shared | Premium Shared | Business Shared | |
|---|---|---|---|
| Websites | 1 | Unlimited | Unlimited |
| Free Domain | No | Yes | Yes |
| Email Accounts | 1 | Unlimited | Unlimited |
| Bandwidth | 100 GB | Unlimited | Unlimited |
| LiteSpeed | Included | Included | Included |
| WordPress Acceleration | Included | Included | Included |
| Allocated Resources | 1X | 2X | 4X |
| Monthly Cost | From $2.99 per month | $2.89 | $3.99 |
The true difficulty with domain name purchases is coming up with the ideal domain name and selecting the appropriate extension. The domain registration procedure only takes a few minutes once that is finished.
The five steps to registering a domain name are as follows:
- Locate a reputable domain registrar. To make sure your domain is in trustworthy hands, take the time to do some research before selecting a domain registrar.
- Search for a domain name. To locate the domain you want to purchase, use a domain checker.
- Choose a domain. After selecting a domain registration period, complete the purchase.
- Register the domain in its entirety. Send your contact details so they can be preserved on WHOIS.
- Check who owns the domain you just purchased. Before using a domain name, confirm that you are the owner of it and give it time to propagate.
- Consider buying a domain name straight away before a rival does, as it is easy to do so before building a website.
We trust that this post has given you the knowledge you need to register a domain for your website. Please let us know in the comments if you have any further queries.
Part – 2 (Steps 4 – 6) – How To Create A WordPress Blog From Scratch
Installing WordPress on a Hostinger (recommended)
Step 4: How to Install WordPress and Set It Up
We firmly advise choosing the WordPress Starter package it costs only $2.99/mo, even if you’re just starting off. Yes, there will be a steeper learning curve and perhaps more effort on your part, but having your own site that you can manage is invaluable, so it pays to put in the extra time. You can set up any themes, plugins, and services you like, run advertisements, and monetize your site any way you see fit. Almost no restrictions apply to a self-hosted WordPress blog.
You will require web hosting before you can install WordPress so that it can manage your domain, store all of your files, and maintain your site.
With Hostinger, a superb and well-known hosting provider, you can launch a WordPress blog for as little as $2.99 per month for the purposes of this article. Even the cheapest plan from Hostinger includes a Free domain, an SSL certificate to increase the security of your website, the opportunity to install WordPress with just a few clicks, and 24/7 support.
The admin username and password for your WordPress dashboard have now been configured. Create a username and password using your email address, then click the Next button to receive the first login link for your WordPress dashboard.
After completing these steps, WordPress will successfully install on your server and you’ll get an email with a link to log in. To sign into your WordPress dashboard, click the provided link. Victory! Set to go. Isn’t it quick and straightforward to install WordPress on Hostinger in this manner? You may now begin planning and building your WordPress website.
Easy methods to Set up WordPress With Auto Installer
To put in WordPress as rapidly as attainable, search for a webhosting supplier that may carry out the set up for you. Some internet hosting suppliers, together with Hostinger, provide a fast and straightforward set up methodology utilizing an Auto Installer. Our WordPress hosting plans, for instance, are particularly optimized for WordPress and allow you to full the set up in just some clicks. Right here’s find out how to use Hostinger’s Auto Installer:
Below are the instructions for registering with Hostinger and using the “one-click install” button to set up WordPress.
You must first log in to your hosting account. To do so, go to Hostinger’s website and click the Log In button in the upper right corner. https://www.hostinger.com/cpanel-login
As soon as you access this URL, the login page will appear. Simply log in using the credentials you just generated during the signup process, or you can also use the email confirmation you received from Hostinger after making the final payment. When you log in, your dashboard will display information about your plan.

When you click Manage, Hostinger’s straightforward yet effective hPanel control panel will be shown to you;
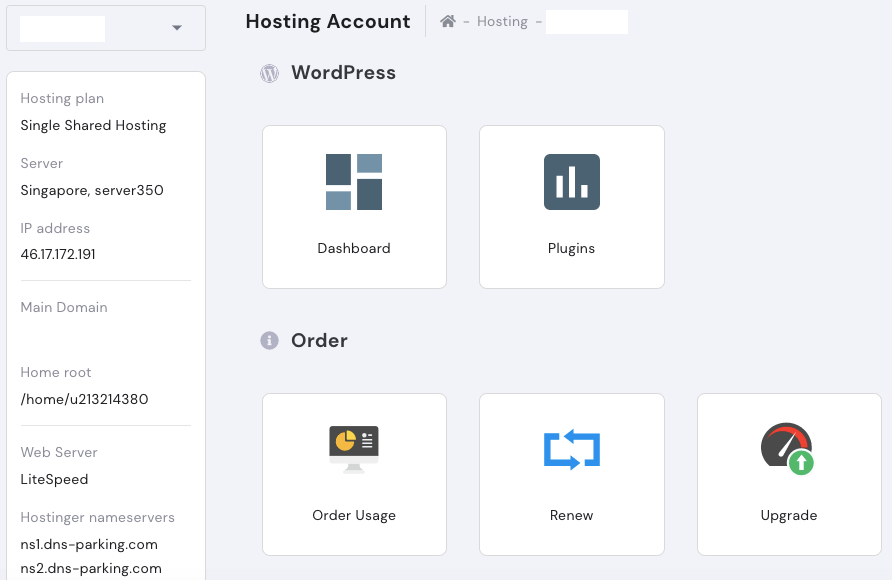
Locate the Auto Installer option beneath the Website section as you continue to scroll down.
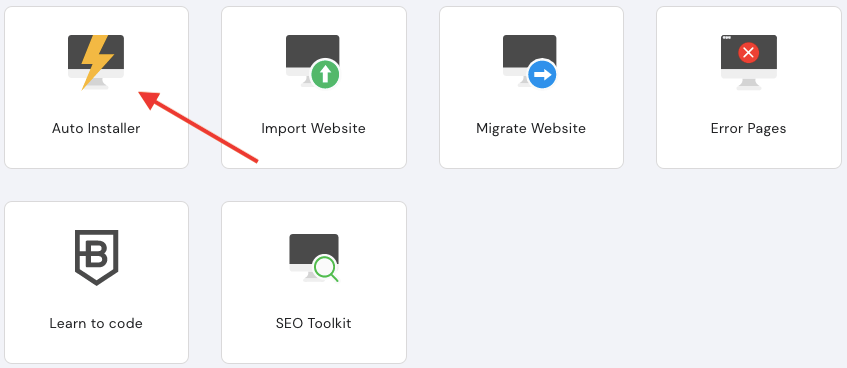
Select WordPress (the most popular) under Auto Installer, then proceed.

Subsequent, it’s worthwhile to replenish a easy WordPress kind
- Confirm your area title and ensure “wordpress” is there subsequent to it
- Setup Administrator Username, Password, and E mail for WordPress Dashboard
- Present a Web site Title
- Choose a related language
- Decide-in to All the time replace to newest accessible model for automated updates
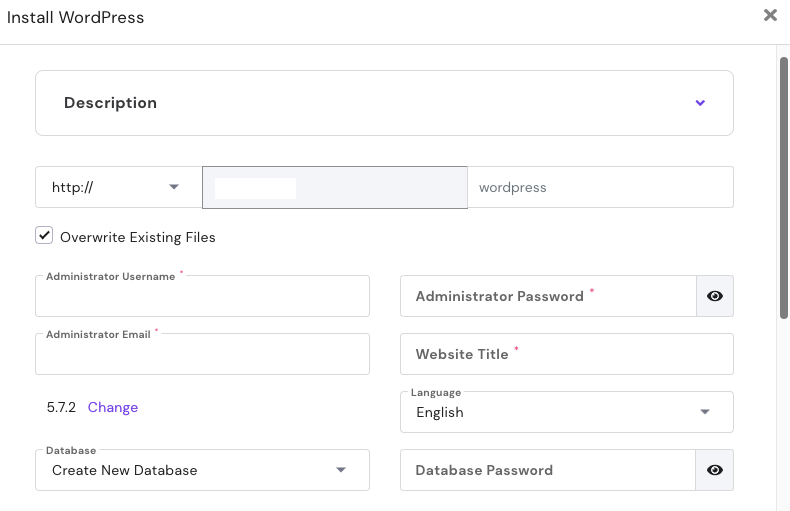
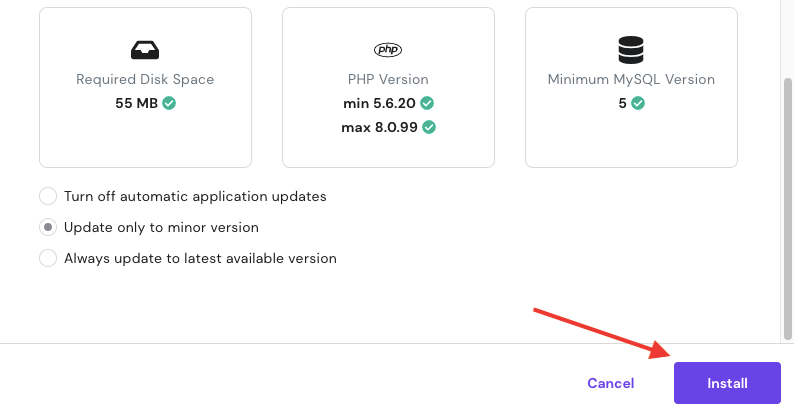
Press the Install button after entering all the necessary information. Your Hostinger account will have WordPress installed, and you can verify this in the Auto Installer – Installed Applications section.

As soon as you see WordPress installed, select Manage by clicking the three dots next to your WordPress URL. Finally, click Edit Website to enter the WordPress Admin interface.
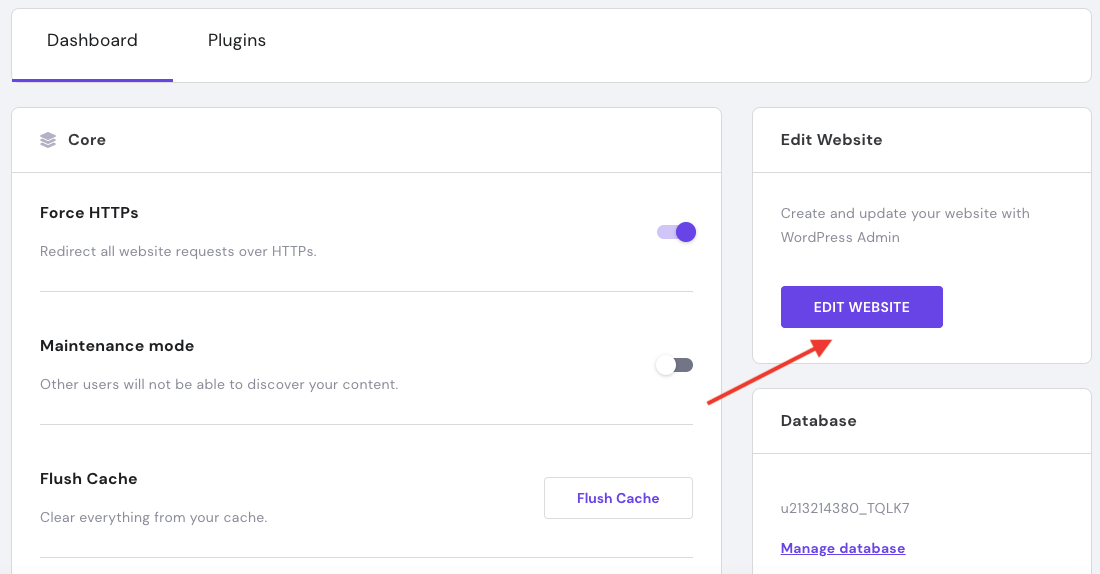
Once WordPress has been successfully installed on your server, you will also get an email with a login link. For a quick login to your WordPress dashboard, just click that link.
What is WordPress?

WordPress is an open-source content management system (CMS) that is free to use and renowned for being user-friendly. Since its first release in 2003, WordPress has grown to become the most popular blogging platform in the world, powering millions of sites. You’d be shocked to learn that WordPress powers 41% of the internet. WordPress is used on every type of website, including Fortune 500 companies and small company websites. WordPress is a free and open-source CMS (Content material Administration System), written in PHP and paired with MySQL and MariaDB. WordPress was initially launched in 2003. It helps a number of working methods akin to Unix-like, Home windows, and Linux.
Why WordPress?
So, that was the fast introduction to WordPress and on this part, we are going to focus on why it is best to select WordPress on your Web site. Listed below are the explanations to decide on WordPress on your new web site:
- WordPress Is Free: Among the best issues about WordPress is that it’s fully free. Sure, it doesn’t cost you something to put in and function on your web site.
- Say No To Code: WordPress means that you can create a web site with few drag-and-drop choices. It’s fully free and permits customers to create a sexy {and professional} web site that even doesn’t find out about HTML. You additionally get entry to numerous web page builders like Elementor to do your activity simply.
- Time Journey: WordPress permits customers to schedule the posts and pages which suggests you don’t have to fret about some occasion pages or posts. You simply create the web page and schedule it. WordPress will mechanically make it reside on the scheduled time.
- Multi-Pages Help: It means that you can distribute one prolonged web page into separate completely different pages.
- Add Blocks: WordPress Block Editor means that you can create and design a sexy web site by utilizing predefined blocks. You simply need to drag-and-drop and use the block. The most effective factor is which you can customise the colour, measurement, and font of your content material.
WordPress is greater than sufficient. These have been only some of the options of WordPress. If you wish to be taught extra about its options and companies, you possibly can learn the total WordPress Features.
What Makes WordPress So Popular?
Listed here are some causes that make WordPress the #1 selection for each net developer.
1. WordPress is free The very best factor about WordPress is that it’s utterly free. Sure, you wouldn’t be charged even a single penny to put in and use it in your web sites.
2. Ease of use One other factor that makes it so in style is its ease of use. WordPress could be put in through the use of an installer supplied by the internet hosting suppliers help you design skilled web sites with out writing a single line of code. Furthermore, it’s suitable with famend web page builders like Elementor, Beaver Builder, Divi, and so forth. that additional lets you construct beautiful-looking web sites rapidly.
3. Gutenberg: Gutenberg is a model new block editor for the WordPress platform that drastically modified the best way you create posts, pages, merchandise, and every little thing else in your web site.
4. Scheduling Capabilities: WordPress means that you can schedule your posts and pages to be revealed at a future time. This implies you don’t want to fret about publishing your articles at a selected time. Merely, end the writing half and schedule them to go reside on the day and time you want.
5. Plugins WordPress has over 55,000 plugins to assist your web site meet your wants.
6. Subsequent Stage Help They’ve received quite a lot of sources that will help you get essentially the most out of WordPress.
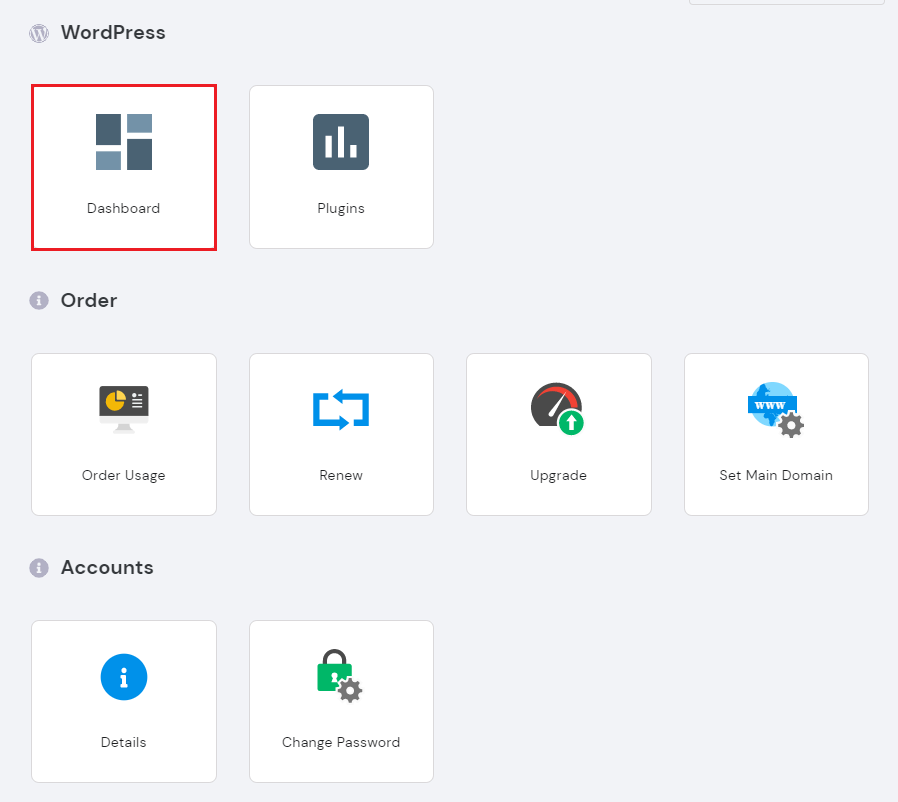
Another way to access the WordPress Admin Dashboard is by clicking the Dashboard button under WordPress on hPanel.
Important! If you don’t notice any changes on your WordPress site after following these instructions, clear browser cache.
Easy methods to Set up WordPress with Softaculous
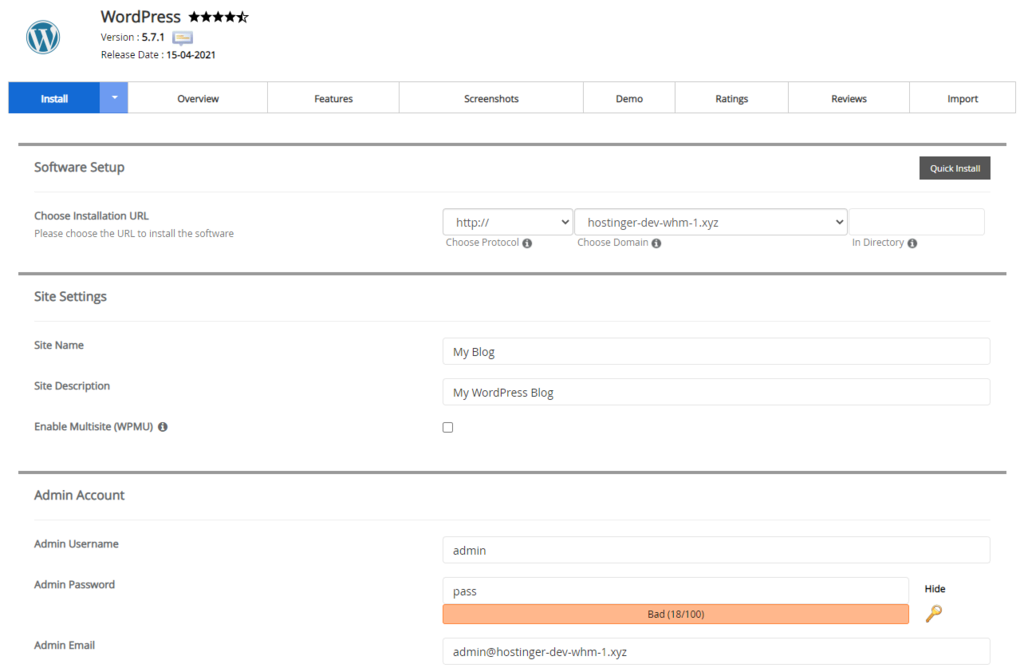
One other fast and straightforward approach to set up WordPress is utilizing Softaculous, a well-liked Auto Installer for cPanel, Plesk, DirectAdmin, InterWorx, and H-Sphere. On this tutorial, we’ll use cPanel:
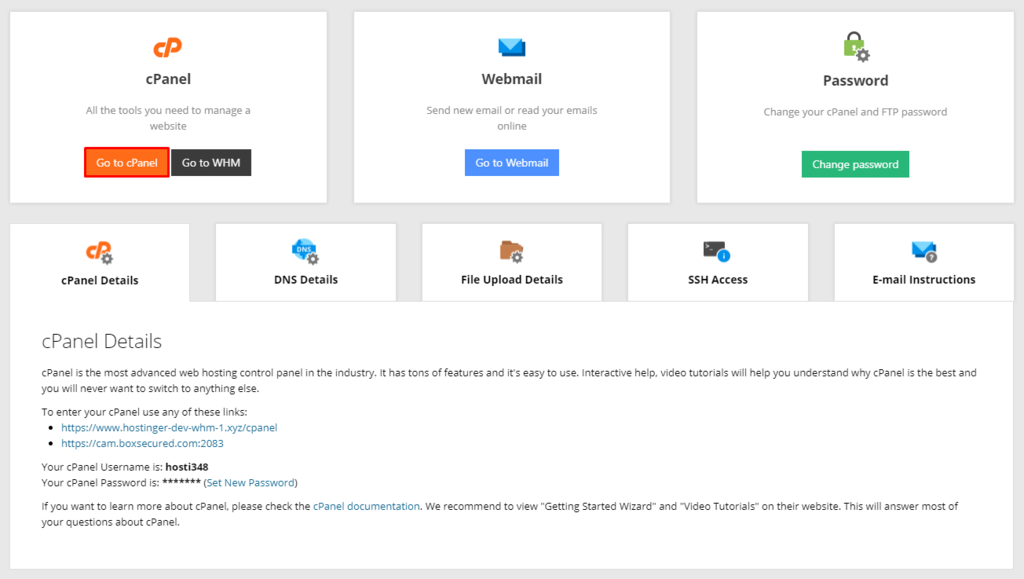
- Log in to your website hosting management panel and entry your cPanel account.
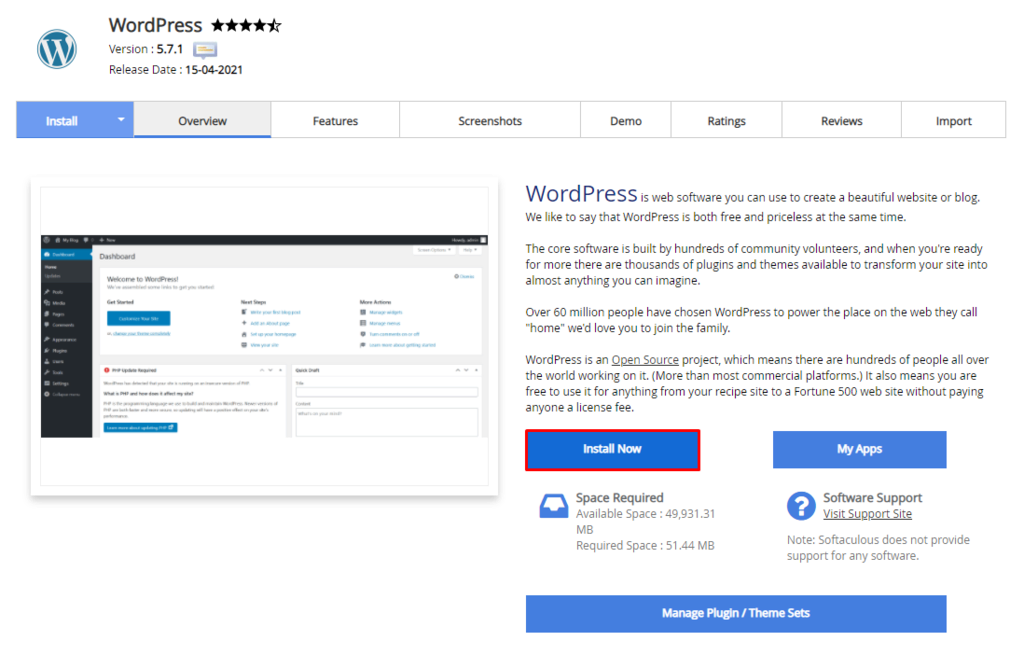
- Head to Softaculous Apps Installer and click on WordPress.
- Locate and click the WordPress Install Now button.
- Make sure to fill in your Site Name, Site Description, Admin Username, Password, Email, and choose your preferred language.
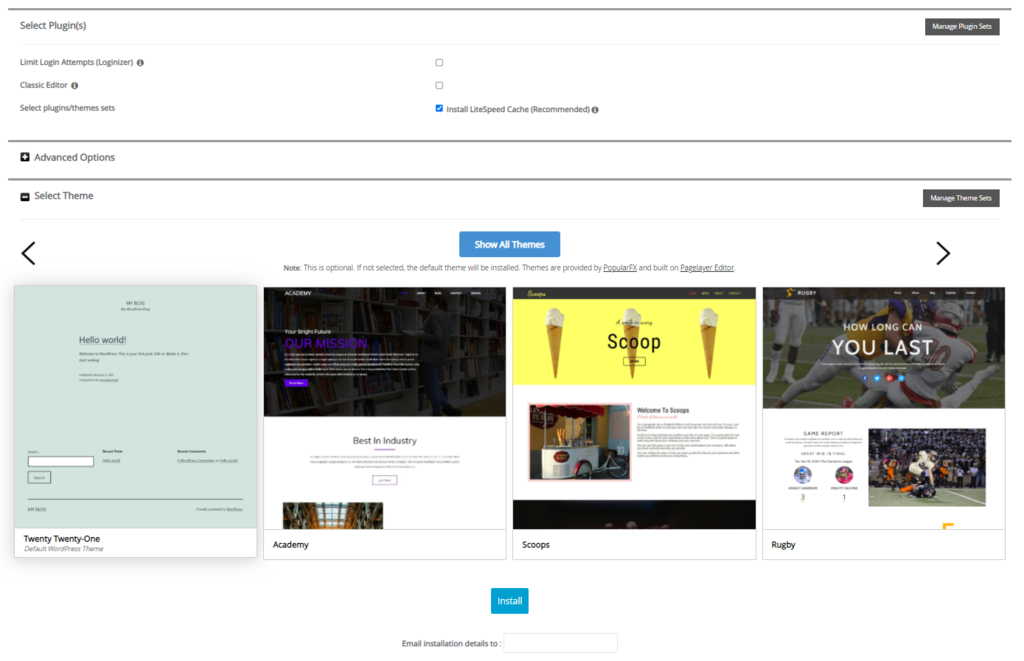
- This kind additionally supplies further choices to assist get your WordPress website began:
- There’s a Choose Plugin(s)possibility, together with the Restrict Login Makes an attempt, Traditional Editor, and Set up LiteSpeed Cache plugins.
- Right here, you must also choose a WordPress theme in your website. Click on on Present All Themesto seek for it within the directory.
- To get your whole set up particulars, fill out the E mail set up particulars tothe sector.
When you end filling out the shape, click on Set up.
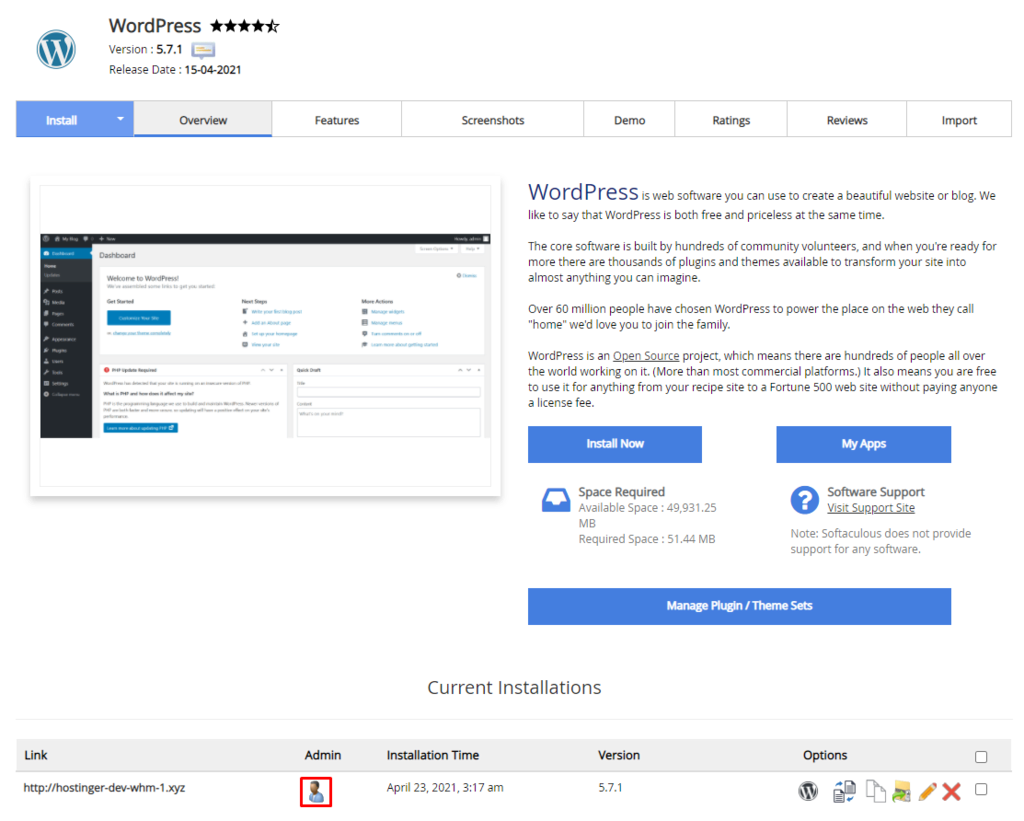
To access the installed WordPress Admin, click on the WP Admin icon under Current Installations.
Step 5: How to Install Blocksy WordPress Theme (Recommended)
Your WordPress theme will decide how your weblog will look. Prior to now, you needed to rent an internet designer to design your weblog or web site however lately, you are able to do it by your self utilizing a WordPress theme. On this step, we will set up a contemporary, fast-loading WordPress theme that appears nice.
#1. Select a WordPress theme
For this tutorial, we will use the free model of the Blocksy theme. It is likely one of the finest free themes out there. It has design and customization options that you just don’t typically discover in free themes.
The Blocksy theme may be used for any website. It’s easy to use and has tons of features even on the free edition, so you can construct a company, portfolio, or eCommerce website with just a few clicks.
The Pro edition of the theme offers extra performance-related features to improve your website’s user experience. It’s SEO-optimized, so potential buyers may find your site more quickly.
Blocksy is a feature-rich, free theme with quick loading speeds and a modern style that can be enhanced with a paid plugin. You risk nothing by trying it since it’s free.
Logging into the WordPress Dashboard is the initial step in the installation of a new WordPress theme. Once there, use the left panel to choose Appearance > Themes. You may view every theme that is presently installed in your application here. Click Add New to add an additional one. Then, search by typing “blocksy” into the search box at the upper right corner. This Blocksy theme ought to appear in the search results. To download and install this free theme on your host server and your website, click the Install button.
A theme is not immediately active after installation. To make it the active theme for your website, you must manually click the Activate button.
Why Use Blocksy theme?
- It is one of the most popular themes in the WordPress theme repository, with over 80,000+ active installations.
- It’s extremely rated (5 stars).
- It’s light-weight. If you want your website to load quickly, that is crucial.
- It’s Gutenberg and WooCommerce Supported.
- It is always updated, which helps protect your blog from malware.
- You get the free version of Blocksy, a great page builder that uses Gutenberg . You also get a large number of attractive starter templates.
Do you have to get a paid model of the Blocksy theme?
For people who intend to publish regular blogs, the free version of the Blocksy Theme is extensive. Blocky is enough. However, there are circumstances in which you may want the professional version, such as:
- You Need Fast Support. This helps in the event you want somebody to shortly type out issues along with your theme.
- You want to make dynamic, unique designs.. You get much more design options than within the free model together with the flexibility to create child themes.
- You want to make pop-ups, sliders, or better landing pages because you run a business or work in digital marketing.
- You wish to begin an e-commerce retailer. You may design a beautiful and very effective e-commerce store with the help of the many excellent WooCommerce options included in the Blocksy startup themes.
- You want to take advantage of their attractive lifetime offer. You pay once and receive upgrades, new releases, and lifetime support. In compared to many other themes, the Blocksy professional theme is quite affordable. It will save you money that you would have otherwise spent on sliders, pop-up builders, landing page builders, and theme builders.
Set up a WordPress theme
I’ll show you how to set up both the free and the premium versions of the Blocksy theme in this section. You can use the following procedure to install the Blocksy theme.
1. Visiting from the WordPress admin dashboard, go to Add New >> Themes then Add New.
2. Go to the search themes bar on the top proper nook after which seek for “Blocksy ’ and click on Set up then Activate.
3. After activation, you’ll obtain a popup thanking you for putting in the Kadence theme and asking if you wish to set up starter templates. Click on Set up Blocksy starter templates. Starter templates might be helpful in the event you don’t wish to design your web site from scratch.
Tip: For those who don’t get any popup, you may also set up the starter templates by going to Plugins >> Add New after which trying to find Blocksy Companion (Premium). Click on Set up Now after which Activate.
4. If you’re using the Blocksy theme, or any other premium theme that isn’t in the WordPress theme repository, you need follow this procedure. Visit the Blocksy website to purchase the theme (or your vendor web site). You may download the purchased theme as a Zip file.
Go to your WordPress admin dashboard then click on Look, Themes then Add New.
3. On the top of the web page, click on on the button for Add Theme then Browse. You should use this button to navigate to the place your zip file is saved in your laptop and add the zip file.
4. Click on on Set up then click on Activate
Step 6: How to Write the First Post on your Blog
You may choose to create either pages or articles on a WordPress blog. Static pages typically employ pages (such as home page, blog page, or contact page). Posts are used for frequently updated material. A post, as opposed to a page, often includes the date, the author’s name, and the option for comments.
How to create a page in WordPress (Steps)
To create a new page:
- Out of your WordPress admin dashboard, go to Pages then Add New.
- Enter the title of your web page within the top field.
- Enter the content material utilizing Gutenberg blocks by clicking the plus signal, alternatively, you possibly can paste your content material in and Gutenberg will mechanically convert it into blocks.
- Click on Publish once you end.
Every WordPress blog must have following pages.
Listed under are the precept pages you wish to your weblog.
#1. Home Web page
The purpose of the home page is to introduce visitors to the types of content that are available on your website. A well-optimized front page may play a crucial role in assisting your visitors in navigating your website, which can help increase the time they spend on your blog. On the home page, you may find information such as:
- The most recent posts
- Standard posts
- Your ‘cash posts’ i.e the posts that make you probably the most cash
- Your electronic mail signup provide
- Any services or products you promote
You may arrange this page to automatically display your most recent blog articles if your site is still relatively new and doesn’t have a lot of content.
#2. About Web page
You should introduce yourself and your company on the about page. You may improve your E-A-T (Experience, Authoritativenss, and Trustworthiness) to gain higher Google ranks by having a strong “About” page on your website. One of the details you might want to include in this is:
- Why you created your weblog
- Your experience and why you assume you’re the finest particular person to assist folks
- Your notable achievements or awards
- Your Story
#3. Contact Web page
Your contact web page is the place you present your customer with a method to contact you. Among the data you may have right here embody:
- A contact kind. Your guests can use this type to ship you an electronic mail. There are various methods you may create a contact kind utilizing free plugins like Fluent Types or Kadence blocks.
- A telephone quantity. For those who run a enterprise, you may embody a enterprise telephone quantity for folks to name you.
- A map. This may assist your prospects discover the place your enterprise is situated in case they wish to go to.
The are different pages that you could be want however you don’t must create them in the beginning
- Disclaimer Web page. For those who earn cash out of your weblog from endorsing merchandise or by means of affiliate marketing online, FTC tips require that you’ve this web page.
- Privateness coverage web page. For those who accumulate data out of your guests that you must have a privateness web page that tells your guests which sort of data you accumulate and for what functions.
- Phrases of service web page. This web page outlines the foundations for utilizing your web site and the services and products in it.
Create and publish a blog
Learn how to compose a blog post
To create a brand new publish:
- Out of your WordPress admin dashboard, click on Posts then Add New.
- Add your weblog publish title on the top.
- You possibly can add content material to your publish by typing instantly or by pasting content material from a phrase doc. Click on on Kind/to decide on a block
- If you happen to want a particular fashion, for instance, a header, button, or picture, you can add it as a Gutenberg block. Click on on the + signal which will provide you with entry to totally different blocks.
- Upon getting completed writing your publish, you may add a class
- There are some optionally available issues it’s also possible to do like including a featured picture or including tags to your publish.
- As soon as you might be executed writing your publish, click on Publish.
Creating your first new post
For your first few blog articles to be pretty average. Getting them put to work is a really potent influence. This could help you become more comfortable with the process of operating a blog. Consistent blogging may also help you gain momentum and develop blogging as a habit. You can always return later and change your entries, which is one of the beautiful things about blogging. Think carefully about the purpose of your blog post before you start writing.
- What downside are you fixing?
- Who’re you writing the publish for?
- What would you like your guests to do after studying your publish?
Fast tips about writing weblog posts that generate profits
So that you can generate profits out of your weblog posts, you first want to draw the correct of holiday makers to your weblog after which get them to learn your posts. Listed here are three fast ideas that may make it easier to do that.
1. Write Website positioning-optimized weblog posts. Write posts that focus on key phrases that individuals are already trying to find in Google. For those who do a great job of this, you’ll get free evergreen visitors from Google. Use a key phrase instrument like Semrush (wonderful however costly) or Keysearch (inexpensive) to seek out out which key phrases individuals are typing into Google.
2. Write compelling headlines. Persons are extra more likely to learn and share your posts when you’ve got compelling and attention-grabbing headlines. Because of this some top entrepreneurs spend extra time on their headlines than their precise content material. Earlier than you publish your publish, have a look at posts which can be already rating in your key phrase and see what sort of weblog titles they’ve.
3. Remove grammatical errors. Grammatical errors will make your weblog look amateurish and this may decrease your conversion fee. Use a instrument like Grammarly to right errors in your weblog publish earlier than you publish. They’ve a free and a paid model of Grammarly. In case you are beginning out, the free model is okay however when you’ve got the funds, the paid model will make it easier to catch extra errors (see Grammarly features and pricing).
Part – 3 (Steps 7 – 9) – How To Create A WordPress Blog From Scratch
Step 7: How to Use Plugins to Change a WordPress Blog
On your website, plugins function similarly to applications. They increase the functionality of your blog so you can do things like add contact forms, security features, or e-commerce stores. In this phase, we’ll install crucial, high-quality plugins that won’t slow down your website or make you vulnerable to hacker attacks.
How you can set up WordPress plugins
- Set up a free plugin from the WordPress listing
You will get hundreds of free plugins from the WordPress plugin listing.
1. To get plugins within the WordPress listing, go to your WordPress admin dashboard then click on on Plugins then Add New. 2. You may browse the obtainable plugins or seek for a plugin by title within the search plugins bar. 3. As soon as you discover the plugin you need, click on set up now after which Activate.
- How you can Set up a plugin that’s not obtainable within the WordPress listing
You too can set up a plugin that’s not within the WordPress repository, for instance, a premium plugin that you’ve got purchased from a vendor.
1. Go to your WordPress dashboard then click on Plugins then Add New.
2. On the top of the web page, you can find a button for Add Plugin then Browse. You should use this button to seek for your zip file in your laptop.
3. Add the zip file after which click on Set up Now. Enter your license particulars then Activate.
Important Plugins for a new blog
Within the WordPress plugin directory, you may find many excellent plugins at no cost. However, you shouldn’t include too many unnecessary plugins as they’ll slow down your website and perhaps provide a security risk. I’ll highlight some of the key plugins you should use in this section. I’ll outline the best free plugin and the best premium (paid) plugin for each task.
In general, paid plugins offer more robust features than their free counterparts, and you also get customer support. The free versions will get you by while you build your blog if you’re just starting out and don’t have the money for the expensive plugins. A few essential plugins you’ll require are:
- Backup – UpdraftPlus is the best WordPress backup plugin. That you must create common backups of your web site in case one thing ever goes incorrect.
- Safety – Sucuri Security is a free safety scanner for WordPress. We’ve a whole step-by-step WordPress security guide for rookies that may assist you safe your weblog.
- Efficiency – We suggest utilizing both WP Rocket or WP Super Cache (free) to speed up WordPress. For extra on this matter see our article on WordPress speed and performance with step-by-step directions.
- Design & Customization – We suggest utilizing both SeedProd or Divi web page builder for customizing your homepage design, creating customized touchdown pages, and even creating customized themes (with out writing any code). For extra on this matter, see our article on best WordPress page builders.
- Electronic mail Advertising – We suggest utilizing Constant Contact or HubSpot as your email marketing service. To get extra e mail subscribers, we suggest utilizing OptinMonster free plugin to create high-converting popups, scroll containers, and name to actions.
Step 8: How to make your website work better for SEO
Have you recently launched a website? All that remains is to draw people to it. To have your website appear as one of the top results on search engines like Google and Bing, you must first learn about Search Engine Optimization, or SEO.
With so many websites on the internet today, with 576,000 new ones being added every day, there is no assurance that yours will rank #1 on Google. There are, however, several things you can do to improve your site’s chances of appearing on Google and ranking well.
Create unique page names and descriptions.
Did you know that each page of your website may have its own title and description? These are short sentences that define your company’s services in detail. They should ideally include a few keywords and phrases.
Have you ever hovered your mouse over a browser tab? The title of the page is the brief sentence that appears when you hover your cursor over it. While the description does not appear on your page, it is critical for search engines to comprehend what your site and webpages are about.
Use anchor text
Consider where you may utilise anchor text on your website while you compose the content for it. The clickable text on a hyperlink known as “anchor text” allows users to go straight to another web page on your website or elsewhere on the internet.
To make it easier for visitors to explore your website and locate what they are searching for, employ effective anchor text. Incorporate words and phrases that are pertinent to what you do as well. For instance, if you own a t-shirt printing company, the phrase “Check out our assortment of print on demand t-shirts” on your site can act as an anchor text link to your online store, which is packed with t-shirts, as you would have predicted.
Use alt tags, or alternative text descriptions, to always provide your picture and video media a description. In particular for users of text-only browsers or screen readers, they make it possible for search engines to find your website, which is essential.
Step 9: How to Make Money With Your Blog
The main question is: Where are all the readers once you’ve made your website, selected an awesome blog topic, and published your first posts? You can’t just expect readers to stumble into your site and immediately begin reading it. You must advertise it! There are various methods you may make cash out of your weblog
You won’t likely get seen if you don’t have social media accounts in today’s world, as with any business. For your blog, we advise creating pages or profiles on Facebook, Twitter, Instagram, TikTok, Snapchat, and even LinkedIn (because you’re effectively running your own business, right?). Design these accounts using a colour scheme or theme that complements your blog so that your brand is consistent and clear.
Use them to publish fresh material and tag other bloggers, influencers, and businesses who might help your work get seen by more people.
2. Use affiliate marketing on your blog
The way affiliate marketing operates is by incorporating monitored affiliate links into your blog’s material. Every time a reader clicks on to one of your recommended websites and makes a purchase, you can earn a small commission. The links will direct visitors to a brand’s website, and you will be compensated as a “thank you” for directing some of your devoted readers to their website.
A lot of online retailers including Amazon, ASOS, and Apple have affiliate programmes of some kind.
You may offer companies that relate to your audience banner advertising space on your blog page as a more visually appealing kind of advertising. Advertising can be put anywhere, although it’s usually in the sidebar or at the top of blog pages.
There are two methods to make money. CPM (cost per thousand) implies you’ll negotiate a fixed payment for every 1,000 ‘impressions’ the ad receives, whereas CPC (cost per click) means you’ll receive a set payment for each reader who clicks the advertisement.
4.Sell digital products on your blog
You may also charge for access to eBooks, video tutorials, seminars, or workshops if you have knowledge to share or counsel to impart. You must be able to demonstrate your exceptional skill in your field or the high value of your material in order for this choice to succeed. This isn’t easy.
Online communities tend to believe that everything should be free of charge, therefore it might be challenging to persuade them to pay up. But it’s worth a shot, right?
Summary – How To Create A WordPress Blog From Scratch
By now, if you followed the instructions exactly, you ought to have a WordPress site that is optimised for earning money and that is appealing, quick, safe, and all of the above. You’re now prepared to start the hard work of sharing your material with the world since you have a blog subject, domain, and hosting in your possession.
Everything begins with your desire. You’re on the correct track as long as you put in the writing effort and incorporate your expertise and hobbies into your postings. While you’re starting to gain a following, post frequently. This manner, you may provide a wealth of your work for each new wave of readers to enjoy. By taking a little more time to write each blog article, you can start drawing in your readership. You only need to keep posting consistently and gain as much knowledge about blogging as you can.
Frequently Asked Questions (FAQs) – How To Create A WordPress Blog From Scratch
Having helped thousands of people start a blog, we have answered quite a lot of questions. Below are the answers to the most frequently asked questions about creating a blog.
Can I create a blog without WordPress?
Yes, there are several other blogging platforms available. We have compared them all, and WordPress is by far the best website builder solution in the market to make a blog with complete ownership and freedom.
Can I build a blog without hosting?
No, that’s not possible. Web hosting is where your website files are stored. All websites need web hosting. To start a blog, you will need your own domain and web hosting.
How do I come up with a good blog name for my site?
Most personal blogs use the author’s name as the domain name. Other blogs have titles that reflect the industry or topic they fall under.
What is the best blogging niche?
Choosing the right niche for your blog makes it easier to create engaging content and make more money online. Our experts have researched the best blogging niches that you should consider when starting your blog.
Can I design a blog with no coding skills?
Absolutely. You don’t need any programming, coding, or design skills to create a professional-looking WordPress blog. WordPress themes are easy to customize and you can just point and click to set up your theme. There are WordPress themes like Astra which comes with ready-made starter websites that you can import with one-click. There are other powerful themes like Divi which give you complete drag & drop design options for customizing your blog.
Can I switch blogging platforms later?
When creating a blog for the first time, often beginners make the mistake of choosing the wrong platform like Medium, Tumblr, Blogger, or others. The good news is that yes you can easily switch to WordPress.







Thanks for sharing this useful article.
Thanks keep reading and sharing